Insufficient fit of the SNK-P0064AP3 heatsink to the processor on H12SSL

Notice: Page may contain affiliate links for which we may earn a small commission through services like Amazon Affiliates or Skimlinks.

dnb

Member
Nov 19, 2022
41
1
8
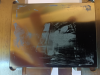
I'm using a Supermicro SNK-P0064AP3 heatsink to cool an EPYC 7763 on a Supermicro H12SSL-I motherboard. I have several identical machines and have noticed that on one machine the CPU temperature seems to be 10 degrees Celsius warmer than on others. Typically, when idle, this processor on other similar machines has a temperature of 35 degrees Celsius in this room, while on this particular machine it is 45 (see screenshot ipmi.png).

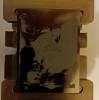
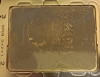
I removed the radiator. Then, from the imprint of thermal paste (Arctic MX6), I realized that the heatsink did not fully adhere to the processor. You can see it in the photos attempt1_1.png and attempt1_2.png. Then I replaced the motherboard with the same one and replaced the SNK-P0064AP3 heatsink with the same one, just a different copy of the SNK-P0064AP3. The result also looks unsatisfactory: see photos attempt2_1.png and attempt2_2.png. In these photos, you can see that even the stripes that I left when I smeared the thermal paste with the Thermal Grizzly spatula were preserved on the thermal paste. Thus, in these places, the heatsink did not exactly adhere to the processor. I'd say the heatsink fit is only about 60% of the CPU surface.

Then I thought that I wasn't tightening the screws well enough. I use a high quality Wera screwdriver WE-051205 or a WIHA antistatic screwdriver. I twist the "cross" in the following order:
  1. Lower right
  2. Top left
  3. Upper right
  4. Lower left
I twist until I feel a stop if I turn the screwdriver with two fingers (thumb and forefinger). If I apply more force, it will be similar to the force required to tighten the screw to attach the shelf to the wall, or when you assemble the cabinet yourself with the same screwdriver.

As a result, in idle I have a temperature of about 42-45, and in the mprime test up to 65 and even 70 degrees for a short while.

Q: Do you think I should apply more force when screwing on the heatsink? or should I tighten the screws in a different order? Or continue to work like this, because the temperature in idle time does not look critical? Does anyone know the force with which the radiator screws must be tightened (in Newton per meter)?

Thank you!
 

Attachments

Last edited:

dnb

Member
Nov 19, 2022
41
1
8
no, you need to apply "1.5Nm 15kg-cm 13.3ln-lb 18Ft oz" of torque :D
As far as I know from reading the documentation many times, this torque only applies to socket's spring-loaded Force Frame.
Using a diagonal pattern, tighten the four screws down on the heatsink in a clockwise fashion till it is secure. The heatsink will now be secured and you have finished installing the processor and heatsink onto the motherboard.

As for the installation of the radiator, the guide here is limited to the words:
"Using a diagonal pattern, tighten the four screws down on the heatsink in a clockwise fashion till it is secure. The heatsink will now be secured and you have finished installing the processor and heatsink onto the motherboard."
 

thedman07

New Member
Sep 14, 2020
24
23
3
As far as I know from reading the documentation many times, this torque only applies to socket's spring-loaded Force Frame.
Using a diagonal pattern, tighten the four screws down on the heatsink in a clockwise fashion till it is secure. The heatsink will now be secured and you have finished installing the processor and heatsink onto the motherboard.

As for the installation of the radiator, the guide here is limited to the words:
The springs are what provide the appropriate amount of force. You should be tightening the screws until they bottom out. It shouldn't take that much force, but you don't need to mess around with only using a thumb and forefinger,... Doing it in a cross pattern is a good idea, but its not rocket science.
 
  • Like
Reactions: RolloZ170 and dnb

dnb

Member
Nov 19, 2022
41
1
8
The springs are what provide the appropriate amount of force. You should be tightening the screws until they bottom out. It shouldn't take that much force, but you don't need to mess around with only using a thumb and forefinger,... Doing it in a cross pattern is a good idea, but its not rocket science.
There is a chance to break an expensive motherboard. At the same time, turning this radiator in my hands, I noticed that the springs are very stiff. It takes a lot of effort to squeeze them even a little.
 

thedman07

New Member
Sep 14, 2020
24
23
3
There is a chance to break an expensive motherboard. At the same time, turning this radiator in my hands, I noticed that the springs are very stiff. It takes a lot of effort to squeeze them even a little.
If you're afraid that you won't be able to tell when the screw is fully installed, and that you'll put a screw through a piece of fiberglass and copper, you might want to take it to someone else to help you.

I don't know what to tell you... If they're not cross threaded, it should be really easy to tell when they're bottomed out. The way the heat sink works, is that you bottom out the screws and the springs provide the appropriate amount of pressure. Its fairly fool proof. You're WAY overthinking it. I've installed that exact heatsink on that exact motherboard.
 

RolloZ170

Well-Known Member
Apr 24, 2016
5,378
1,619
113
just a thought:
have you checked if the CPU surface is higher than the upper retention plate/frame ?
i mean the Heatsink can sit up on the frame, maybe the CPUs heatspreader is different in dimension.
 

RolloZ170

Well-Known Member
Apr 24, 2016
5,378
1,619
113
the cooler can also sit up on the 3 screws of the CPU retention frame.
wrong screws ?
 

dnb

Member
Nov 19, 2022
41
1
8
just a thought:
have you checked if the CPU surface is higher than the upper retention plate/frame ?
i mean the Heatsink can sit up on the frame, maybe the CPUs heatspreader is different in dimension.
Since I tested 2 different new h12ssl, as well as two different brand new SNK-P0064AP3, this almost rules out a factory defect that could have caused this unevenness. This is Supermicro's recommended heatsink for this board. Everything is stock and new.
 

RolloZ170

Well-Known Member
Apr 24, 2016
5,378
1,619
113
Since I tested 2 different new h12ssl, as well as two different brand new SNK-P0064AP3, this almost rules out a factory defect that could have caused this unevenness. This is Supermicro's recommended heatsink for this board. Everything is stock and new.
i talked about the CPU not the boards/heatsinks
CPU in the upper area bigger than others ? or flatter, not reaching up to the heasink surface.
in that case all boards/heatsinks will have same issue.
 

dnb

Member
Nov 19, 2022
41
1
8
If they're not cross threaded, it should be really easy to tell when they're bottomed out. The way the heat sink works, is that you bottom out the screws and the springs provide the appropriate amount of pressure. Its fairly fool proof.
I also installed these heatsinks, but with 16-core Milan, the idle temperature was fine for me, because it's only 16 cores and the temperature will be acceptable even if the heatsink is not ideally installed. Now we are talking about the top 64-core processor, where there is much less room for error, if at all.
 

dnb

Member
Nov 19, 2022
41
1
8
i talked about the CPU not the boards/heatsinks
CPU in the upper area bigger than others ? or flatter, not reaching up to the heasink surface.
As far as I can see, it is exactly the same as the 16-core EPYCs I have. These are standard elements, how can they differ from each other?
 

RolloZ170

Well-Known Member
Apr 24, 2016
5,378
1,619
113
As far as I can see, it is exactly the same as the 16-core EPYCs I have. These are standard elements, how can they differ from each other?
flatten by the seller ?
something is different, you have to find out what.
 
  • Like
Reactions: dnb

dnb

Member
Nov 19, 2022
41
1
8
flatten by the seller ?
something is different, you have to find out what.
Do you mean that the seller could have made some manipulations with this processor, which led to the fact that it became flatter?
 

RolloZ170

Well-Known Member
Apr 24, 2016
5,378
1,619
113
Do you mean that the seller could have made some manipulations with this processor, which led to the fact that it became flatter?
sand down, reprint
he or whoever. it is just something that can explain your problem.
 

thedman07

New Member
Sep 14, 2020
24
23
3
I also installed these heatsinks, but with 16-core Milan, the idle temperature was fine for me, because it's only 16 cores and the temperature will be acceptable even if the heatsink is not ideally installed. Now we are talking about the top 64-core processor, where there is much less room for error, if at all.
It should be really really easy to rule out whether the right amount of pressure is being applied to the heat sink. When you talk about using two fingers to turn a screwdriver and all of the fretting around torque and screwing in shelves or building cabinets, it really makes me think that you're afraid to turn it until it is bottomed out, at which point it will have the correct pressure.

Just tighten the screws in a completely normal way until they won't turn any more. It would be very very hard for you to damage your motherboard this way.
 
  • Like
Reactions: RolloZ170

alex_stief

Well-Known Member
May 31, 2016
884
312
63
38
Those images look like there was not nearly enough force on the mount. Either the heatsink screws are not bottomed out, or there is something else that makes contact before the CPUs heatspreader.
Just for reference, the force applied to mounting a cooler on a CPU is equivalent to 50kg and more. Probably a lot more for these large CPUs. The springs that control the force have to be stiff. Not being able to deform them with your bare hands is by design.
If I had to guess from the description, it sounds like the screws for the heatsink were not bottomed out. As long as you don't go full ham on it with both hands, breaking something by screwing in the heatsink is next to impossible. Turn the screws with reasonable force until you feel the actual end of the threads.
 
  • Like
Reactions: thedman07

RolloZ170

Well-Known Member
Apr 24, 2016
5,378
1,619
113
@dnb can you check with a ruler that the CPUs surface si ahead of the retention plate and screws 1-2-3
and apply some more thermal paste like this
image_thumb-2.png
@alex_stief if the thread ends and the screw does not turn, you can't do any more pressure.
SNK.jpg
 
  • Like
Reactions: sam55todd