Blowing down into the heatsink. Out of curiousity, do you plan to run the e300-9d without the top cover? Otherwise, I'm not sure how you'll fit an 80mm fan in that small case.Hi, I want to place a noctua 80mm on my e300-9d cpu heatsink. In which way should I put it on? Should it blow cold air on the cpu or suck hot air away? Thnx
Cooling the CPU, X11SDV-4C-TLN2F
- Thread starter Tiw
- Start date
-
- Tags
- supermicro x11sdv
Notice: Page may contain affiliate links for which we may earn a small commission through services like Amazon Affiliates or Skimlinks.
this is an interesting question. there is no space o place any fan on top of the heatsink, even if there would be "enough", there would be way to little space for proper airflow.Out of curiosity, do you plan to run the e300-9d without the top cover?
What I did with my e200 - I have replaced existing fans by the Noctua ones and installed additional (there, in the case, was one place free, covered by blind) - otherwise it was very laud as a flying jet turbine.
Last edited:
Thanks! I've mounted it to blow air to the cpu and it seems to be cooling quite good. It runs on 57 degrees celcius with some load running.Blowing down into the heatsink. Out of curiousity, do you plan to run the e300-9d without the top cover? Otherwise, I'm not sure how you'll fit an 80mm fan in that small case.
For your information. No I won't run it without the cover. I bought a new case. A Coolermaster H100. I was so tired of all that noise from the stock fans that I bought a whole new case.
Would you mind to share some ideas how you have done it? ...some pictures?2021 and I'm still watercooling my X10SDV-7TP4F")
It would be very interesting
There you go
https://www.reddit.com/r/homelab/comments/96gew7
https://www.reddit.com/r/homelab/comments/96gew7
Cool, thanks!
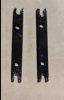
@kingcody What measurement units did you use for these clips? mm or cm? I want to use a service to get these printed for me.I know this is quite an old thread but I made some simple clips for mounting an 80mm Noctua in a 2U case, hope it helps someone.

X11SDV Heatsink Fan Clip by kingcody
This is a heatsink fan clip that can be used with the Supermicro X11SDV Xeon D passive heatsink with a Noctua 80mm fan and a standard 80mm fan grill.www.thingiverse.com
N00b,The IS-60 - ID-COOLING would be a perfect cooler for the Silverstone 381 case and a 12 core X11 variant, it's low profile and has a 130w TDP, the CPU only has an 85w TDP. I wish I had the ingenuity to create a bracket. Does anyone know of a service or someone that will take payment to create one?
I got some https://www.amazon.com/gp/product/B08M5LN45D/ref=ppx_yo_dt_b_asin_title_o00_s00?ie=UTF8&psc=1 from amazon, and ground down the retention clips to 51mm.
I'm on an x10SDV, but the ram clearance was an issue, until I bent the heatpipes a little.
Attachments
-
 38.9 KB Views: 140
 -
 239.9 KB Views: 144
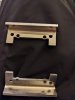
Following up on my home-made clips on page 3, I finally broke down and made some 3D models so I could have proper brackets for a Noctua L12S fabricated from aluminum. The fine people at SendCutSend made them from 1/8 in aluminum 5052, including the bending. I think they came out to $12 per pair. The design uses the stock cooler's shoulder screw, spring, washer, and retaining clip. I plan to install these this weekend and will post an update after I get done.
Attachments
-
 277.1 KB Views: 90
 -
 248.1 KB Views: 91
 -
 251.4 KB Views: 81
Looking forward to the pictures after the installationFollowing up on my home-made clips on page 3, I finally broke down and made some 3D models so I could have proper brackets for a Noctua L12S fabricated from aluminum. The fine people at SendCutSend made them from 1/8 in aluminum 5052, including the bending. I think they came out to $12 per pair. The design uses the stock cooler's shoulder screw, spring, washer, and retaining clip. I plan to install these this weekend and will post an update after I get done.
Any update? Have you had a chance to get it installed? Pics?Following up on my home-made clips on page 3, I finally broke down and made some 3D models so I could have proper brackets for a Noctua L12S fabricated from aluminum. The fine people at SendCutSend made them from 1/8 in aluminum 5052, including the bending. I think they came out to $12 per pair. The design uses the stock cooler's shoulder screw, spring, washer, and retaining clip. I plan to install these this weekend and will post an update after I get done.
UPDATE 2022/06/04: A few details kept nagging at me, mostly that if I push the HSF onto the CPU heat spreader very little heatsink compound would transfer from the HSF to the heat spreader. This made me think there was still something physical preventing ideal contact. To ensure the brackets were not hitting anything, I moved them to the top of the heatsink. This change necessitated getting longer screws, and longer screws required different springs.
An aside regarding springs: the original springs (both from the stock HSF and the extra sets I bought from Alpha Novatech) were too long with the 19 mm screws (SS-19-4.2-M3-4.2, they were pretty much fully contracted and at their solid length, which could cause them to take a set, ie they would likely warp and continually reduce their spring coefficient over time), which means the distance from the top of the shoulder screw to the bracket was 3.5 mm. This short of a distance meant it was very unlikely to find a spring that would work because most have solid lengths of at least 3 mm, so I needed to use longer shoulder screws. Changing over to the 22 mm screws (SS-22, both use smaller diameter e rings than the stock screws, but you can also order them from AN) the working distance would increase to 6.5 mm. Looking on the AN site, I took all of the spring data and dumped it into a spreadsheet to figure out which springs could be compressed to 6.5 mm and be at about 70 % of their working range (this is the limit AN gives before springs take a set). From there, I chose the strongest spring that met these criteria (if you would like a copy of the spreadsheet, DM me) and chose S001YJ08. The end result was idle temps from 28 C to 30 C and temps under full load are 40 C to 43 C.

Now on to the X11SDV fun times. Trying to swap the cooler from an X11SDV to my test X10SDV was a no go. Turns out the X11SDV HSF holes (left to right) are 3 mm closer than those on the X10SDV and the front-to-back hole distances are far longer. Womp womp... One revelation that came right away is the stock HSF springs from the X11SDV are _stiff_, which might explain the lower temperatures. Additionally, the shoulder screws are fatter and have coarser thread so using the same screws for an X10SDV and an X11SDV will not work. I also noticed the HSF base is not long enough to make contact with all of the heat spreader, so I should have been using a copper shim (self -= 1). Going back into OnShape, I took the X10SDV design and modified it (the first one did not work, which is how I found out the 3 mm problem). Once the second set of brackets arrives next week I will give them a try and post another update.
UPDATE 2022/04/24: The temps were not what I was expecting, because this same modification on my 3 x11sdv (1x 8 core and 2x 12 core) resulted in idle temps around 20 C and load temps averaging about 40 C. The 1541 first converted below turned out pretty well, but the other 2x 1540 and 1x 1541 nodes I converted below had idle temps of 33 C and load temps of 55 C. This makes no sense to me with these older models having TDPs of 45 W vs the 90ish W for the X11SDVs. After taking these apart a couple times I finally figured out what was going on. The VRMs between the CPU and the ethernet ports are tall enough to keep the HSF from sitting flush on the CPU because the ends of the heatpipes extend over the top of these VRMs.
The two solutions I came up with are:
1) Re-design the aluminum brackets to shift the HSF back the other direction, in which case the ends of the heatpipes would not touch the VRMS (and the HSF would no longer be centered on the CPU).
2) Use a pair of pliers to bend up the ends of the heatpipes.
As you likely guessed, I went with option (2). This lowered the load temps another 5 C and, so far as I can see with the limited viewing angles, the heatpipe ends are no longer touching the VRMS.
Some day I plan to swap a setup from one of the 1540 nodes with one of the X11SDV nodes to see what difference it makes.
@TXAG26 I am very sorry for the long delay, my 6 (now 8) month old and a new job opportunity kept me from my computers.
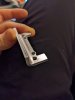
Here is the bare board with the brackets in front, now to drill and tap the brackets. I did not have a 3.3 mm diameter drill, but Ace Hardware had a bunch of #30 drill bits which worked just fine, and then an M4 tapered tap with a couple drops of Tap Magic. I kept the HSF in its cardboard packaging to protect it during the process and keep as many metal shavings out, as possible. I also used a chamfering bit to put a bit of a taper on the hole to make starting the tap easier. I used a tapping stand, as opposed to free tapping the holes, because starting them was difficult when attempting to free hand them. Third thumbnail depicts using a hand tap to cut the threads a second time and get more of the chips out.


On to assembling the brackets, the parts all of the shoulder screws, springs, washers, and C rings came from the OEM heatsink.
I tried to find replacements, but have yet to successfully do so. AlphaNovatec has a good assortment of shoulder screws, but none with the proper C ring-to-tip distance. Be careful of any washers you get, I picked up some PTFE ones from McMaster, but they were tall, but the ID and OD were similar and somewhat too large so the spring didn't seat very well on top of them. Lastly, C rings are ideal because they easily stay clear of the M4 screw holes, but the circular kind with an internal star often have too large of an OD.


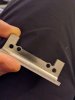
Here is the completed assembly using low-profile stainless steel M4 x 10 mm screws from McMaster. Were I to do this again, I would order ultra low-profile screws to ensure there is more distance between the screw head and the mobo (though not right now b/c they cost $4 per screw). The current low-profile screws leave 0.5 to 1.0 mm of distance, and I am loathe to dremel or file them which would render them noticeably more magnetic.


After lots of isopropyl alcohol and compressed air to clean up the HSF, next came the installation. Ideally I would have figured out a method for getting at the shoulder screws without bending or cutting the fins, but using a low-profile screwdriver would have taken an eternity. Once again, Ace Hardware came through with a narrow-shaft flat blade screwdriver, which only required bending the fins a bit (previous incarnations used a 1/4 in drill bit to make holes through the fins, which was ugly and made me feel dirty).


Now on to the installation, which took a bit because I had to add AS5/install the HSF/uninstall the HSF several times to completely coat the CPU die.

Finally, testing the end result! With the stock Noctua 12 mm fan the load temps (using stress --cpu 8) for a couple days and the temps varied from 36 C to 41 C, which is over 10 C lower than the custom HSF I previously created. Another big benefit is the noise is incredibly quiet relative to the 2x Sunon 60 mm fans.

If you have any questions, just let me know.
An aside regarding springs: the original springs (both from the stock HSF and the extra sets I bought from Alpha Novatech) were too long with the 19 mm screws (SS-19-4.2-M3-4.2, they were pretty much fully contracted and at their solid length, which could cause them to take a set, ie they would likely warp and continually reduce their spring coefficient over time), which means the distance from the top of the shoulder screw to the bracket was 3.5 mm. This short of a distance meant it was very unlikely to find a spring that would work because most have solid lengths of at least 3 mm, so I needed to use longer shoulder screws. Changing over to the 22 mm screws (SS-22, both use smaller diameter e rings than the stock screws, but you can also order them from AN) the working distance would increase to 6.5 mm. Looking on the AN site, I took all of the spring data and dumped it into a spreadsheet to figure out which springs could be compressed to 6.5 mm and be at about 70 % of their working range (this is the limit AN gives before springs take a set). From there, I chose the strongest spring that met these criteria (if you would like a copy of the spreadsheet, DM me) and chose S001YJ08. The end result was idle temps from 28 C to 30 C and temps under full load are 40 C to 43 C.
Now on to the X11SDV fun times. Trying to swap the cooler from an X11SDV to my test X10SDV was a no go. Turns out the X11SDV HSF holes (left to right) are 3 mm closer than those on the X10SDV and the front-to-back hole distances are far longer. Womp womp... One revelation that came right away is the stock HSF springs from the X11SDV are _stiff_, which might explain the lower temperatures. Additionally, the shoulder screws are fatter and have coarser thread so using the same screws for an X10SDV and an X11SDV will not work. I also noticed the HSF base is not long enough to make contact with all of the heat spreader, so I should have been using a copper shim (self -= 1). Going back into OnShape, I took the X10SDV design and modified it (the first one did not work, which is how I found out the 3 mm problem). Once the second set of brackets arrives next week I will give them a try and post another update.
UPDATE 2022/04/24: The temps were not what I was expecting, because this same modification on my 3 x11sdv (1x 8 core and 2x 12 core) resulted in idle temps around 20 C and load temps averaging about 40 C. The 1541 first converted below turned out pretty well, but the other 2x 1540 and 1x 1541 nodes I converted below had idle temps of 33 C and load temps of 55 C. This makes no sense to me with these older models having TDPs of 45 W vs the 90ish W for the X11SDVs. After taking these apart a couple times I finally figured out what was going on. The VRMs between the CPU and the ethernet ports are tall enough to keep the HSF from sitting flush on the CPU because the ends of the heatpipes extend over the top of these VRMs.
The two solutions I came up with are:
1) Re-design the aluminum brackets to shift the HSF back the other direction, in which case the ends of the heatpipes would not touch the VRMS (and the HSF would no longer be centered on the CPU).
2) Use a pair of pliers to bend up the ends of the heatpipes.
As you likely guessed, I went with option (2). This lowered the load temps another 5 C and, so far as I can see with the limited viewing angles, the heatpipe ends are no longer touching the VRMS.
Some day I plan to swap a setup from one of the 1540 nodes with one of the X11SDV nodes to see what difference it makes.
@TXAG26 I am very sorry for the long delay, my 6 (now 8) month old and a new job opportunity kept me from my computers.
Here is the bare board with the brackets in front, now to drill and tap the brackets. I did not have a 3.3 mm diameter drill, but Ace Hardware had a bunch of #30 drill bits which worked just fine, and then an M4 tapered tap with a couple drops of Tap Magic. I kept the HSF in its cardboard packaging to protect it during the process and keep as many metal shavings out, as possible. I also used a chamfering bit to put a bit of a taper on the hole to make starting the tap easier. I used a tapping stand, as opposed to free tapping the holes, because starting them was difficult when attempting to free hand them. Third thumbnail depicts using a hand tap to cut the threads a second time and get more of the chips out.
On to assembling the brackets, the parts all of the shoulder screws, springs, washers, and C rings came from the OEM heatsink.
I tried to find replacements, but have yet to successfully do so. AlphaNovatec has a good assortment of shoulder screws, but none with the proper C ring-to-tip distance. Be careful of any washers you get, I picked up some PTFE ones from McMaster, but they were tall, but the ID and OD were similar and somewhat too large so the spring didn't seat very well on top of them. Lastly, C rings are ideal because they easily stay clear of the M4 screw holes, but the circular kind with an internal star often have too large of an OD.
Here is the completed assembly using low-profile stainless steel M4 x 10 mm screws from McMaster. Were I to do this again, I would order ultra low-profile screws to ensure there is more distance between the screw head and the mobo (though not right now b/c they cost $4 per screw). The current low-profile screws leave 0.5 to 1.0 mm of distance, and I am loathe to dremel or file them which would render them noticeably more magnetic.
After lots of isopropyl alcohol and compressed air to clean up the HSF, next came the installation. Ideally I would have figured out a method for getting at the shoulder screws without bending or cutting the fins, but using a low-profile screwdriver would have taken an eternity. Once again, Ace Hardware came through with a narrow-shaft flat blade screwdriver, which only required bending the fins a bit (previous incarnations used a 1/4 in drill bit to make holes through the fins, which was ugly and made me feel dirty).
Now on to the installation, which took a bit because I had to add AS5/install the HSF/uninstall the HSF several times to completely coat the CPU die.
Finally, testing the end result! With the stock Noctua 12 mm fan the load temps (using stress --cpu 8) for a couple days and the temps varied from 36 C to 41 C, which is over 10 C lower than the custom HSF I previously created. Another big benefit is the noise is incredibly quiet relative to the 2x Sunon 60 mm fans.
If you have any questions, just let me know.
Attachments
-
 231.7 KB Views: 88
Last edited:
Hi everyone.
First off, I really appreciate this thread, I've had to do so much research and planning for simply cooling a frickin CPU. But, lessons were learned.
I've been sitting on a NAS server project for months because of overheating issues, and thanks mostly thread on this forum my server is finally running. I wanted to share my own experience here, since my solution is a bit different than others, maybe someone else will go this route. It's quite a budget solution - it works, but it's still delicate.
Hardware
Motherboard: x11sdv-4c-tp8f
Chassis: Rosewill RSV-L4500U
Issue: PCH / CPU reaches ~90c idle, 100c+ doing any work.
Actual cause: This motherboard was designed for a high static pressure chassis, like this, which is designed to passively cool the CPU by using that high static air pressure. Dropping the board in a 4u chassis instead of 1u means that there is a substantial amount more air pressure to fill.
Troubleshooting
I've compared some solutions on this and similar threads. My chassis is 4u, so I am not limited to low profile cooling solutions. I really didn't want to drill, and some of the bracketed / 3d printed solutions seem pretty complex considering I just need the fan to stay put. The zip ties seemed like an easy solution, but I wasn't sure what temperatures these are rated for, plus I'm not sure how you'd keep the heatsink mounted flush with zip ties running underneath. I considered pasting the fan to the heatsink, but this would block the screws needed to mount/unmount the heatsink. I've also considered the advice of ordering the active-cooled version of this heatsink, but ended up not going this route because I couldn't be 100% certain the products I was looking at would even fit - plus, everyone know Noctua is the way to go
My solution
Glue 4 screws, pointed upwards, to the top of the heatsink. I carried the fan into the hardware store and found flat-top screws just big enough to fit through the fan mounting holes. Add a few washers to add a slight gap under the fan (prevent fan plastic from direct heat), got 4 screw nuts to secure the fan. The makeshift posts go all the way to the corners of the heatsink, so this fan just barely fits.
Adhesive I used: MG Chemicals - 8329TFF-25ML 8329TFF Thermally Conductive Adhesive - Fast Cure Epoxy, 25 mL Dual Dispenser
Results


About fragility... The only surface area the adhesive has to work with is the edge of the heatsink fins - not very much to work with for a strong bond. After my first attempt, I accidentally broke one of the screws off trying to remove excess dried adhesive - I held it with my thumb pushing against one of the screws by accident. I was a bit more liberal with the adhesive the second time around, adding some extra adhesive to the screw heads. I considered making small "feet" for the corners (think of half of a cube) of the heatsink to make a more solid mounting point for the screws, but this wasn't necessary as I am pretty happy with how it's holding up now, and I don't plan on moving it any time soon.
Also worth noting that the way I have the 4500U loaded up with 10 drives in the front is less than ideal, there is hardly any room for intake between the drives. Holding a piece of paper in front of the chassis I can see there is air is intermittently being pushed / pulled out of the front.
Anyways, thanks STH for the ideas an inspiration to get off my ass and troubleshoot. Hope all of you eventually sorted out your cooling issues.
First off, I really appreciate this thread, I've had to do so much research and planning for simply cooling a frickin CPU. But, lessons were learned.
I've been sitting on a NAS server project for months because of overheating issues, and thanks mostly thread on this forum my server is finally running. I wanted to share my own experience here, since my solution is a bit different than others, maybe someone else will go this route. It's quite a budget solution - it works, but it's still delicate.
Hardware
Motherboard: x11sdv-4c-tp8f
Chassis: Rosewill RSV-L4500U
Issue: PCH / CPU reaches ~90c idle, 100c+ doing any work.
Actual cause: This motherboard was designed for a high static pressure chassis, like this, which is designed to passively cool the CPU by using that high static air pressure. Dropping the board in a 4u chassis instead of 1u means that there is a substantial amount more air pressure to fill.
Troubleshooting
- First I upgraded all of the chassis fans with the overkill Noctua 3000RPM fans, that didn't help, but these fans are great for static pressure compared to normal computer fans (I run them at about 50%), so it's good to know I can crank these up if needed.
- I replaced the stock thermal paste with Grizzly Hydronaut and placed a Noctua NF-A8 PWM on top of the heatsink (blowing downward). As soon as the fan was placed, my temps were greatly improved (now 35-40c).
Great, now to get the fan to stay there...
I've compared some solutions on this and similar threads. My chassis is 4u, so I am not limited to low profile cooling solutions. I really didn't want to drill, and some of the bracketed / 3d printed solutions seem pretty complex considering I just need the fan to stay put. The zip ties seemed like an easy solution, but I wasn't sure what temperatures these are rated for, plus I'm not sure how you'd keep the heatsink mounted flush with zip ties running underneath. I considered pasting the fan to the heatsink, but this would block the screws needed to mount/unmount the heatsink. I've also considered the advice of ordering the active-cooled version of this heatsink, but ended up not going this route because I couldn't be 100% certain the products I was looking at would even fit - plus, everyone know Noctua is the way to go
My solution
Glue 4 screws, pointed upwards, to the top of the heatsink. I carried the fan into the hardware store and found flat-top screws just big enough to fit through the fan mounting holes. Add a few washers to add a slight gap under the fan (prevent fan plastic from direct heat), got 4 screw nuts to secure the fan. The makeshift posts go all the way to the corners of the heatsink, so this fan just barely fits.
Adhesive I used: MG Chemicals - 8329TFF-25ML 8329TFF Thermally Conductive Adhesive - Fast Cure Epoxy, 25 mL Dual Dispenser
Results
About fragility... The only surface area the adhesive has to work with is the edge of the heatsink fins - not very much to work with for a strong bond. After my first attempt, I accidentally broke one of the screws off trying to remove excess dried adhesive - I held it with my thumb pushing against one of the screws by accident. I was a bit more liberal with the adhesive the second time around, adding some extra adhesive to the screw heads. I considered making small "feet" for the corners (think of half of a cube) of the heatsink to make a more solid mounting point for the screws, but this wasn't necessary as I am pretty happy with how it's holding up now, and I don't plan on moving it any time soon.
Also worth noting that the way I have the 4500U loaded up with 10 drives in the front is less than ideal, there is hardly any room for intake between the drives. Holding a piece of paper in front of the chassis I can see there is air is intermittently being pushed / pulled out of the front.
Anyways, thanks STH for the ideas an inspiration to get off my ass and troubleshoot. Hope all of you eventually sorted out your cooling issues.
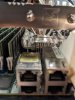
This is my low profile active cooling solution. Solid copper heatsink with 80x10mm fan. Front intake fans are Arctic 40x28mm 6000rpm with noctua PWM fan controller. Also added a 40x10mm blower fan to cool the RAM on the right. The setup is near silent.


Running ESXi with 8 VMs running. Temps below are with the case closed and the server running for the last week.
Name Status Reading
CPU Temp Normal 62 degrees C
PCH Temp Normal 66 degrees C
System Temp Normal 36 degrees C
Peripheral Temp Normal 60 degrees C
MB_10G Temp Normal 69 degrees C
VRMCpu Temp Normal 60 degrees C
VRMAB Temp Normal 65 degrees C
VRMDE Temp Normal 58 degrees C
DIMMA1 Temp Normal 57 degrees C
DIMMB1 Temp Normal 56 degrees C
DIMMD1 Temp Normal 57 degrees C
DIMME1 Temp Normal 56 degrees C
U2NVMeSSD1 Temp N/A Not Present
U2NVMeSSD2 Temp N/A Not Present
FAN1 Normal 2400 R.P.M
FAN2 Normal 4000 R.P.M
FAN3 N/A Not Present
FAN4 N/A Not Present
FANA N/A Not Present
FANB N/A Not Present