Hello friends,
A few of you expressed interest in PiKVM, and since I recently got time to set up mine (which I bought late 2021) I thought I would do a writeup.
What is PiKVM?
PiKVM - Open and inexpensive DIY IP-KVM on Raspberry Pi is the project page.
Basically it is a one person passion project to build a low cost IP KVM platform using the Raspberry Pi. It’s open source, from the software the person developed through to the circuit board design for the HAT/add in board that supports it. TinyPilot is the main competitor, which is apparently more slick but less configurable, twice the price, requires a subscription, and doesn’t support connection to the ATX pins (though this last one is not really a usecase for me anyway).
What are the components?
You can assemble it yourself from a Pi and a bunch of components, or else you can do what I did and buy it as a kit. There’s an official HAT but I bought a clone off Ali Express to get the case and tiny OLED screen included : 89.77US $ 3% OFF|Overip Blikvm Cm4 Raspberry Pikvm Hdmi Csi Kvm Ip Pi V3 Hat - Demo Board Accessories - AliExpress. The same firm (Blicube) makes a Pi3 version and an PCIe version (which is basically a PCIe card which runs the CM4 module). I bought a CM4 module from another AliExpress shop since even back then I couldn’t buy them locally. I bought one with 4GB RAM and 32GB eMMC onboard. 2GB RAM and 16GB eMMC would have been fine, but I wanted to have some future proof-ed-ness. The eMMC was to avoid the risk of the SD card dying prematurely, although PiKVM sets the boot device to read only which reduces wear considerably.
You can do what I did and add an inexpensive IP KVM, this allows you to control up to 16 servers per KVM, and you can potentially set up one PiKVM to drive multiple KVMs.
I only have six servers to manage so I bought an 8 port IPKVM from TESMART (was USD ~$250, now seemingly much more). A list of “supported” KVMs is here : Multiport KVM-over-IP - PiKVM Handbook
Note that the TESMART switches are fine in terms of functionality, but tedious to configure with an initial IP address : TESMART managed multiport KVM switch - PiKVM Handbook
Build process, cables, installation etc?
Just needs a screwdriver, a USB A-C cable, HDMI cable, and a power source. Note that technically you can power it with PoE, and mine seemed to be getting power through the HDMI cable which is not what I expected (and possibly bad). I bought some extra HDMI/USB KVM cables, there were only four included in the TESMART KVM box.
You unscrew the PiKVM’s casing and then you can add in the CM4. Move the boot jumper and ensure the OLED screen is plugged in. You can download a PiKVM boot disk ISO from the site which has the screen pre-configured. You can add the (included) fan if you like loud noises. Plug in the USB port to a PC – I used a Windows box – plug in the Pi power, and turn on. I used rpiboot to initialise the eMMC and then Raspberry Pi Imager to install the ISO, and I also “touch”ed an .ssh file to ensure that I can access it via ssh. Once done, turn off, move the boot jumper back, you’re ready to go.
Plug the HDMI cable into the PiKVM HDMI port and into the HDMI port on the IPKVM. The USB A-C cable plugs into the OTG port and then into the USB 2.0 hub on the IPKVM (in my case, other brands have other requirements). Plug the IPKVM into all the servers. Plug the power into the Pi and the IPKVM. Turn on the IPKVM first, then the Pi, and wait for it to boot. Do not turn on the attached servers yet.
What’s it like in operation?
Once the PiKVM is up, and you’ve changed the IP address and hostname, you can admire some useful information which cycles through on the small screen on the device :


It’s excitingly warm (but apparently Pis only throttle after 85C, so still “fine”) but I think I’ll see what kind of quiet fans I can find for it. It sits in a pretty hot media cabinet with little airflow in my flat. Once it is up, you can turn on the various servers connected to the IPKVM.
The main interface is through the web. but you can ssh in there for funsies too.
Here I’m using WebRTC to connect to this server. I can select the different ports on the IPKVM in the dropdown and the display will switch dynamically. I found the light next to the selected input takes a couple of seconds to switch in the menu, but otherwise it’s pretty responsive.

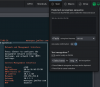
The “Drive” menu gives you the ability to upload ISO images you can attach to the various systems attached to the IPKVM, or it can pull an image from a URL :

You can then attach the ISO to the selected server and mount it and/or boot off it. You can do a completely bare metal OS install this way, I set up four servers like that – BIOS updates first, then install xcp-ng off the ISO.
The Macro menu lets you record a sequence of actions. Note it’s not saved on the device so it needs to be stored centrally – no bad thing, probably. You can upload and download scripts.

You can enter text (including with special characters or key sequences) which will be typed into the console on your behalf.

Another nifty feature is you can use OCR on the screen output to grab things like (in this case) a MAC address. You draw a box around what you want it to recognise and it puts the results into the clipboard. I found the OCR is pretty good most of the time but sometimes it confused a slashed zero for an 8.

You can send special key sequences and shortcuts. This is also useful if your KVM expects a key sequence to switch outputs say. These are customisable through a YAML file.

The System settings allow you to change the update speed of the screen image in case you have bad throughput. You can also screenshot and bring up an onscreen keyboard as a floating window.

You can customise the menus with a YAML override file. There are several different types of functions supported, and apart from straight switches you also have buttons and toggles for on/off switches. Here I set it up to be able to send a WoL magic packet to one of the servers, but it will take almost any GPIO input and output so there’s a lot of flexibility here.

Just to show it’s also super useful for updating BIOS firmware – here I mounted an update ISO and you can follow the whole flashing process throughout via the web browser.

And it gives you a proper console output throughout the boot process, which usually you’d need an iLO/DRAC-style solution for. Most of my boxes only support Intel AMT, which is not not a substitute for this sort of functionality. This is also great for infrastructure devices and appliances which don’t have iLO or you can’t agent, as long as they have some sort of display output you can convert to HDMI.

Conclusion
In summary, in case you can't tell - I’m really impressed with the device. In normal times a well-specced CM4 will run you about USD50-70, the BLiKVM kit I bought is about $100, and my 8 port IPKVM was $250, so for $400 or so you get a very comprehensive and upgradeable IP-addressable KVM solution. It should be pretty durable since there are no moving parts in either the KVM or the Pi, unless you feel the urge to put a fan in the Pi. The menus are extensively customisable and there’s a lot of flexibility with what you can do with the box, beyond just a pure KVM it can control GPIO devices like eg USB HID relays : GPIO (pins, relays, lamps, etc) - PiKVM Handbook
If you really want to you can wire the Pi into the ATX power supply and directly reboot or reset a server that way, this could be a last resort fix for a hung firewall for example. CPU and RAM usage is very low so you could throw a bunch of other functions onto it if needed. It supports Prometheus reporting out of the box, just needs configuring. It will support VNC if you like that. It supports IPMI and Redfish : IPMI & Redfish integration - PiKVM Handbook It has an API : HTTP API reference - PiKVM Handbook There’s a mechanism to update certificates even though the root file system is read only : Let's Encrypt certificates - PiKVM Handbook
In general it’s very well thought through.
Main minus points – it’s not particularly rack-friendly. The IPKVM itself I got has rack ears but you’d need to put the Pi somwhere, and both have wall-wart power supplies (although you can use PoE for the Pi). It runs a bit hot without a fan, but probably not fatally so and likely it’s better in a properly cooled DC which is not just an Ikea media unit under my TV.
Anyway, I think it’s a great little bit of kit, hope this overview was useful.
A few of you expressed interest in PiKVM, and since I recently got time to set up mine (which I bought late 2021) I thought I would do a writeup.
What is PiKVM?
PiKVM - Open and inexpensive DIY IP-KVM on Raspberry Pi is the project page.
Basically it is a one person passion project to build a low cost IP KVM platform using the Raspberry Pi. It’s open source, from the software the person developed through to the circuit board design for the HAT/add in board that supports it. TinyPilot is the main competitor, which is apparently more slick but less configurable, twice the price, requires a subscription, and doesn’t support connection to the ATX pins (though this last one is not really a usecase for me anyway).
What are the components?
You can assemble it yourself from a Pi and a bunch of components, or else you can do what I did and buy it as a kit. There’s an official HAT but I bought a clone off Ali Express to get the case and tiny OLED screen included : 89.77US $ 3% OFF|Overip Blikvm Cm4 Raspberry Pikvm Hdmi Csi Kvm Ip Pi V3 Hat - Demo Board Accessories - AliExpress. The same firm (Blicube) makes a Pi3 version and an PCIe version (which is basically a PCIe card which runs the CM4 module). I bought a CM4 module from another AliExpress shop since even back then I couldn’t buy them locally. I bought one with 4GB RAM and 32GB eMMC onboard. 2GB RAM and 16GB eMMC would have been fine, but I wanted to have some future proof-ed-ness. The eMMC was to avoid the risk of the SD card dying prematurely, although PiKVM sets the boot device to read only which reduces wear considerably.
You can do what I did and add an inexpensive IP KVM, this allows you to control up to 16 servers per KVM, and you can potentially set up one PiKVM to drive multiple KVMs.
I only have six servers to manage so I bought an 8 port IPKVM from TESMART (was USD ~$250, now seemingly much more). A list of “supported” KVMs is here : Multiport KVM-over-IP - PiKVM Handbook
Note that the TESMART switches are fine in terms of functionality, but tedious to configure with an initial IP address : TESMART managed multiport KVM switch - PiKVM Handbook
Build process, cables, installation etc?
Just needs a screwdriver, a USB A-C cable, HDMI cable, and a power source. Note that technically you can power it with PoE, and mine seemed to be getting power through the HDMI cable which is not what I expected (and possibly bad). I bought some extra HDMI/USB KVM cables, there were only four included in the TESMART KVM box.
You unscrew the PiKVM’s casing and then you can add in the CM4. Move the boot jumper and ensure the OLED screen is plugged in. You can download a PiKVM boot disk ISO from the site which has the screen pre-configured. You can add the (included) fan if you like loud noises. Plug in the USB port to a PC – I used a Windows box – plug in the Pi power, and turn on. I used rpiboot to initialise the eMMC and then Raspberry Pi Imager to install the ISO, and I also “touch”ed an .ssh file to ensure that I can access it via ssh. Once done, turn off, move the boot jumper back, you’re ready to go.
Plug the HDMI cable into the PiKVM HDMI port and into the HDMI port on the IPKVM. The USB A-C cable plugs into the OTG port and then into the USB 2.0 hub on the IPKVM (in my case, other brands have other requirements). Plug the IPKVM into all the servers. Plug the power into the Pi and the IPKVM. Turn on the IPKVM first, then the Pi, and wait for it to boot. Do not turn on the attached servers yet.
What’s it like in operation?
Once the PiKVM is up, and you’ve changed the IP address and hostname, you can admire some useful information which cycles through on the small screen on the device :
It’s excitingly warm (but apparently Pis only throttle after 85C, so still “fine”) but I think I’ll see what kind of quiet fans I can find for it. It sits in a pretty hot media cabinet with little airflow in my flat. Once it is up, you can turn on the various servers connected to the IPKVM.
The main interface is through the web. but you can ssh in there for funsies too.
Here I’m using WebRTC to connect to this server. I can select the different ports on the IPKVM in the dropdown and the display will switch dynamically. I found the light next to the selected input takes a couple of seconds to switch in the menu, but otherwise it’s pretty responsive.
The “Drive” menu gives you the ability to upload ISO images you can attach to the various systems attached to the IPKVM, or it can pull an image from a URL :
You can then attach the ISO to the selected server and mount it and/or boot off it. You can do a completely bare metal OS install this way, I set up four servers like that – BIOS updates first, then install xcp-ng off the ISO.
The Macro menu lets you record a sequence of actions. Note it’s not saved on the device so it needs to be stored centrally – no bad thing, probably. You can upload and download scripts.
You can enter text (including with special characters or key sequences) which will be typed into the console on your behalf.
Another nifty feature is you can use OCR on the screen output to grab things like (in this case) a MAC address. You draw a box around what you want it to recognise and it puts the results into the clipboard. I found the OCR is pretty good most of the time but sometimes it confused a slashed zero for an 8.
You can send special key sequences and shortcuts. This is also useful if your KVM expects a key sequence to switch outputs say. These are customisable through a YAML file.
The System settings allow you to change the update speed of the screen image in case you have bad throughput. You can also screenshot and bring up an onscreen keyboard as a floating window.
You can customise the menus with a YAML override file. There are several different types of functions supported, and apart from straight switches you also have buttons and toggles for on/off switches. Here I set it up to be able to send a WoL magic packet to one of the servers, but it will take almost any GPIO input and output so there’s a lot of flexibility here.
Just to show it’s also super useful for updating BIOS firmware – here I mounted an update ISO and you can follow the whole flashing process throughout via the web browser.
And it gives you a proper console output throughout the boot process, which usually you’d need an iLO/DRAC-style solution for. Most of my boxes only support Intel AMT, which is not not a substitute for this sort of functionality. This is also great for infrastructure devices and appliances which don’t have iLO or you can’t agent, as long as they have some sort of display output you can convert to HDMI.
Conclusion
In summary, in case you can't tell - I’m really impressed with the device. In normal times a well-specced CM4 will run you about USD50-70, the BLiKVM kit I bought is about $100, and my 8 port IPKVM was $250, so for $400 or so you get a very comprehensive and upgradeable IP-addressable KVM solution. It should be pretty durable since there are no moving parts in either the KVM or the Pi, unless you feel the urge to put a fan in the Pi. The menus are extensively customisable and there’s a lot of flexibility with what you can do with the box, beyond just a pure KVM it can control GPIO devices like eg USB HID relays : GPIO (pins, relays, lamps, etc) - PiKVM Handbook
If you really want to you can wire the Pi into the ATX power supply and directly reboot or reset a server that way, this could be a last resort fix for a hung firewall for example. CPU and RAM usage is very low so you could throw a bunch of other functions onto it if needed. It supports Prometheus reporting out of the box, just needs configuring. It will support VNC if you like that. It supports IPMI and Redfish : IPMI & Redfish integration - PiKVM Handbook It has an API : HTTP API reference - PiKVM Handbook There’s a mechanism to update certificates even though the root file system is read only : Let's Encrypt certificates - PiKVM Handbook
In general it’s very well thought through.
Main minus points – it’s not particularly rack-friendly. The IPKVM itself I got has rack ears but you’d need to put the Pi somwhere, and both have wall-wart power supplies (although you can use PoE for the Pi). It runs a bit hot without a fan, but probably not fatally so and likely it’s better in a properly cooled DC which is not just an Ikea media unit under my TV.
Anyway, I think it’s a great little bit of kit, hope this overview was useful.
Attachments
-
 101.8 KB Views: 10
Last edited:
