Gigabyte MJ11-EC1 EPYC 3151 Mystery
- Thread starter BMacD
- Start date
Notice: Page may contain affiliate links for which we may earn a small commission through services like Amazon Affiliates or Skimlinks.


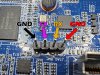
For those interested here is the pinout of "JTAG BMC" for serial TTL adapter (you don't need VCC).

You need to connect it like so:

No need for 3.3v. And use PuTTY serial connector with speed of 115200. You can finde some good info here.
You can login with user: sysadmin, and I set a new password in BMC under "Maintenance->System Administrator" but I cant seem to login as root.
But where to go from there I have no clue. Command "help" does not work. Any information here would be very helpful!
You need to connect it like so:
No need for 3.3v. And use PuTTY serial connector with speed of 115200. You can finde some good info here.
You can login with user: sysadmin, and I set a new password in BMC under "Maintenance->System Administrator" but I cant seem to login as root.
But where to go from there I have no clue. Command "help" does not work. Any information here would be very helpful!
Attachments
-
 319.4 KB Views: 11
Last edited:
You don't need 3.3v if you have power to BMC with the 4-pin power plug to a PSU.TLL adapter signal must be 3.3V? Because there are also 5V variants... To avoid some users burn chip...
The one I got is this one, just because it was in stock locally, and it can do both 3.3v and 5v. But any TTL or UART cable/adapter should work.

Last edited:
How did you go about and changed the server names?It is possible to activate also the other fans and have full control over them!
But it is not the Bios that needs modifying. You need to change the product name of the bord.
From G431-MM0-OT to MJ11-EC0-00 and MJ11-EC1-OT to MJ11-EC0-00.
After a BMC reboot it will be reconfigured and all fans are working.
I managed to do this after a lot of trial and error.
To do it you need root access to the BMC command line. The easiest way is to connect a usb to ttl adapter to the BMC JTAG pins
You will then have a serial console into the BMC.
If someone is interested I can write a down the steps I took.
The image below show the result. 3 fans attached each with its own fan profile and temperature sensor
BR
Peter
View attachment 33745
I have logged in to CLI with PuTTY and a TTL USB adapter. But where to go from there I don't know.
Loggin in as "sysadmin" no problem, but how do i get ROOT access, and the from there changing the names?
Any help is very appreciated
") .
.Good you are on your way.How did you go about and changed the server names?
I have logged in to CLI with PuTTY and a TTL USB adapter. But where to go from there I don't know.
Loggin in as "sysadmin" no problem, but how do i get ROOT access, and the from there changing the names?
Any help is very appreciated
First a warning. This can potentially brick your system. I have had one side effect. The product name disappeared from the BIOS and instead there is a text "To be filled in by OEM" It does not seam to have any impact on running the system.
I did all my testing with the main CPU off, only the BMC powered. I suggest you do the same!
If you are logged in as sysadmin you should have root access (meaning you can do anything on the system)
you should have a normal Linux prompt.
type id to confirm that you are root
Bash:
sysadmin [/conf/user_home/peter]# id
uid=0(sysadmin) gid=0(sysadmin) groups=0(sysadmin),109(kvm),501(ipmi),505(lanadmin),511(serialadmin),533(SmashCLP),539(vmedia)cd /tmp
It is the file SKU.xml in the tmp directory that we need to edit. First list its contents with
cat SKU.xml
In this there are 3 changes to make
G431-MM0-OT to MJ11-EC0-00 in 2 places
MJ11-EC1-OT to MJ11-EC0-00 in 2 places
G431_MM0 to MJ11
The xml file is just one long row so difficult to edit with vi etc. Best is to use sed.
I just tested these commands and they worked. Note the difference of Zero (0) and the letter O
sed -i s/G431-MM0-OT/MJ11-EC0-00/g SKU.xml
sed -i s/MJ11-EC1-OT/MJ11-EC0-00/g SKU.xml
sed -i s/G431_MM0/MJ11/g SKU.xml
now you can do
cat SKU.xml
to verify that the changes have been made
The next step is to run
bmcprog WS=FULL_AREA
this will create SKU.BIN
verify that it is created
cat SKU.BIN
should produce a lot of garbage (it is a compressed file)
Now this file should be flashed with the following command
skurw w flash SKU.BIN
to verify you should run
rm SKU.xml
skupioneer
This will produce some errors but give you a new SKU.xml
verify that this has the 5 changes by doing
cat SKU.xml
If this is OK that you should now reboot the BMC. But first turn on logging in Putty, it can be good to see what happens.
reboot by simply doing
reboot
During the reboot the BMC should generate the new FanPolicy and all 3 fans should be there!
If this is not working maybe the SKU.BIN file needs to be edited. It has an embedded zipped file mysku.xml.gz
that contains the SKU.xml file. If this is the case I will give instructions for that.
If everything works out start up the main CPU and watch the sensors page in the BMCGui
BR
Peter
Thank you very much for this! Will try now.Good you are on your way.
First a warning. This can potentially brick your system. I have had one side effect. The product name disappeared from the BIOS and instead there is a text "To be filled in by OEM" It does not seam to have any impact on running the system.
I did all my testing with the main CPU off, only the BMC powered. I suggest you do the same!
If you are logged in as sysadmin you should have root access (meaning you can do anything on the system)
you should have a normal Linux prompt.
type id to confirm that you are root
now you need to change to the tmp directoryBash:sysadmin [/conf/user_home/peter]# id uid=0(sysadmin) gid=0(sysadmin) groups=0(sysadmin),109(kvm),501(ipmi),505(lanadmin),511(serialadmin),533(SmashCLP),539(vmedia)
cd /tmp
It is the file SKU.xml in the tmp directory that we need to edit. First list its contents with
cat SKU.xml
In this there are 3 changes to make
G431-MM0-OT to MJ11-EC0-00 in 2 places
MJ11-EC1-OT to MJ11-EC0-00 in 2 places
G431_MM0 to MJ11
The xml file is just one long row so difficult to edit with vi etc. Best is to use sed.
I just tested these commands and they worked. Note the difference of Zero (0) and the letter O
sed -i s/G431-MM0-OT/MJ11-EC0-00/g SKU.xml
sed -i s/MJ11-EC1-OT/MJ11-EC0-00/g SKU.xml
sed -i s/G431_MM0/MJ11/g SKU.xml
now you can do
cat SKU.xml
to verify that the changes have been made
The next step is to run
bmcprog WS=FULL_AREA
this will create SKU.BIN
verify that it is created
cat SKU.BIN
should produce a lot of garbage (it is a compressed file)
Now this file should be flashed with the following command
skurw w flash SKU.BIN
to verify you should run
rm SKU.xml
skupioneer
This will produce some errors but give you a new SKU.xml
verify that this has the 5 changes by doing
cat SKU.xml
If this is OK that you should now reboot the BMC. But first turn on logging in Putty, it can be good to see what happens.
reboot by simply doing
reboot
During the reboot the BMC should generate the new FanPolicy and all 3 fans should be there!
If this is not working maybe the SKU.BIN file needs to be edited. It has an embedded zipped file mysku.xml.gz
that contains the SKU.xml file. If this is the case I will give instructions for that.
If everything works out start up the main CPU and watch the sensors page in the BMCGui
BR
Peter
Have you tried BIOS from MJ11-EC0, maybe you it will fix the "To be filled in by OEM" issue.


![Remote KVM [192.168.10.137] - [1024 x 768 ] - Personlig - Microsoft Edge 13-01-2024 21_16_34.jpg](https://forums.servethehome.com/data/attachments/33/33802-c67ed0c0eaff8c74b510dc88d2c0444e.jpg "Remote KVM [192.168.10.137] - [1024 x 768 ] - Personlig - Microsoft Edge 13-01-2024 21_16_34.jpg")
Nice to see!So it worked! Thank you sir!
View attachment 33779
Still same info in BMC and BIOS for SKU. But all these sensors from the GPU's and so on is no longer there, and I can control SYS1 and SYS2 fans, as well as CPU fan like before, nice
View attachment 33780
View attachment 33781
View attachment 33782
I did a lot of trial and errors so might have made something that removed info or updated more that in your case.
I see that you are running 15 degrees higher cpu temp that I have. I put on a 92mm fan, that changed temp and noise!
Peter
Nice work!Nice to see!
I did a lot of trial and errors so might have made something that removed info or updated more that in your case.
I see that you are running 15 degrees higher cpu temp that I have. I put on a 92mm fan, that changed temp and noise!
Peter
Yes defiantly going to swap out the CPU fan. Or maybe try passive cooling and some good airflow
.Are you seeing 4c/8t in bios or by OS itself? I have MJ11-EC1-0T (G431 server) and with F09 bios at least both bios and OS are reporting just 4c/4t config
edit:
edit2: advanced -> amd cbs -> zen common options -> core/thread enablement -> SMTEN
edit:
Apparently there's HT setting somewhere.. hmmThe Hyper Threading seems to be disabled in the G431 boxes per default, you need to enable it in the BIOS (i don´t know where it was, but it was buried a bit deeper). Works fine.
edit2: advanced -> amd cbs -> zen common options -> core/thread enablement -> SMTEN
Last edited:
You need to enable SMT (Symmetric Multithreading Technology) in BIOS, it's off by default on this board:Are you seeing 4c/8t in bios or by OS itself? I have MJ11-EC1-0T (G431 server) and with F09 bios at least both bios and OS are reporting just 4c/4t config
Advanced -> AMD CBS -> Zen Common Options -> Core/Thread Enablement -> Agree -> SMTEN -> Auto
After this change I can see 8 threads in the OS.
Thanks!You need to enable SMT (Symmetric Multithreading Technology) in BIOS, it's off by default on this board:
Advanced -> AMD CBS -> Zen Common Options -> Core/Thread Enablement -> Agree -> SMTEN -> Auto
After this change I can see 8 threads in the OS.
On the G431 IOMMU was disabled by default, as well. That was hidden pretty well into the bios menus, too..
It would be interesting to know, if a board which hasent been flashed and updated at all, can control the sys fans, when falshing we used different firmware which might not behave as expected with the fan sensors and such?
Im definitly gonna try doing that string change, i dont have a USB TTL but i do have some arduinos which have a build in USB Serial adapter which after a quick google search apperently can be used to also debug other devices when unplugging or keeping the arduino microcontroller in a reset state and using the tx and rx pins to connect to the device.
Gonna try that and report later after work
Anyone successfully flashed the bios back to F09 from F02 using the .bin "Dump BIOS" file from BMC. Have tried afuwin in Windows 11. and keep getting the same error 18. Tried to make a bootable DOS USB stick, but so far not able to boot into DOS for some reason.
Using AFUWINGUIx64 in Windows I also took a backup of the F09 bios on another board, but that app saves the bios in a .rom file. Still not able to flash that in BMC or in Windows. Any way to back up a bios into .rbu?

Download the F09 bios in .rom format here for those interesserede (not responsible for anything!).
Using AFUWINGUIx64 in Windows I also took a backup of the F09 bios on another board, but that app saves the bios in a .rom file. Still not able to flash that in BMC or in Windows. Any way to back up a bios into .rbu?
Download the F09 bios in .rom format here for those interesserede (not responsible for anything!).
Last edited:
Hello,Anyone successfully flashed the bios back to F09 from F02 using the .bin "Dump BIOS" file from BMC. Have tried afuwin in Windows 11. and keep getting the same error 18. Tried to make a bootable DOS USB stick, but so far not able to boot into DOS for some reason.
Using AFUWINGUIx64 in Windows I also took a backup of the F09 bios on another board, but that app saves the bios in a .rom file. Still not able to flash that in BMC or in Windows. Any way to back up a bios into .rbu?
View attachment 33819
Download the F09 bios in .rom format here for those interesserede (not responsible for anything!).
I have also flashed the F02 on my first board, and after some work also managed to make the F09 dump into a flashable .rbu image that can be flashed back via the BMC.
This evening I can make it available for download
BR
Peter
That would be awesome, thankyou!Hello,
I have also flashed the F02 on my first board, and after some work also managed to make the F09 dump into a flashable .rbu image that can be flashed back via the BMC.
This evening I can make it available for download
BR
Peter
I cannot find any advantages, but the F02 is made to work with another rev of this board, so maybe there are som differences under the hood, other than some other settings and so on in the bios. Anyways would be nice to be able to go back to original bios for us that flashed F02 on our boards.Is there any advantage of using the F09 BIOS?