Mini-ITX low power supply recommendations?

Notice: Page may contain affiliate links for which we may earn a small commission through services like Amazon Affiliates or Skimlinks.

noduck

Member
Sep 12, 2020
41
13
8
Building a new mini-itx based firewall. Trying to keep it low power, it is running at about ~30W (A2SDi-4C-HLN4F, dual Solarflare 10G, 16GB RAM, NVMe storage). The current power supply is a regular ATX PSU which is outside of the case.

For the final build I would like something more integrated;
-I know about PICO PSU, but dislike the external 12V power brick, and the fact that there is no nice way to secure the barrel plug on the case.
-Flex ATX seems like overkill in power, heat/noise, and cost.

Are there any different options? How about PICO PSU and mouting the power brick inside the case (I think a brick is smaller than Flex ATX)?
 

Markess

Well-Known Member
May 19, 2018
1,187
806
113
Northern California
Your motherboard has a 4 Pin DC Power Connector (JPV1) that lets you connect it directly to a 12V power source. The connector is the same as the 4 Pin ATX Power connector on many motherboards. If you use that, no Pico (or ATX) PSU required.

Assuming your NVMe Drive is in the onboard M.2 socket, the power connection is all you need. If you're considering a 12V brick tucked inside the case, you can connect the brick directly to JPV1 and bypass the 24 Pin ATX connector entirely.

I did a quick search and didn't find any bricks that came with one of these connectors. If you don't like the idea of a barrel jack, you could get an extension, cut off the end you don't need (and the barrel jack on the PSU) and solder them together. Or you could crimp your own if you're set up for that.

1625504921193.png

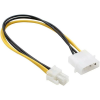
Another option is a brick with a 4 Pin Molex connector of the type used on 3.5 inch drives, and a converter (pictures for reference). Probably more secure than a barrel jack and no soldiering/crimping required. Just need to find a good quality brick:

1625506486203.png1625506565737.png

Just make sure you leave a little room around the brick, since it will generate heat of its own.

I have one of these boards, and am currently using a brick to power it through JPV1. I kept the barrel connector on the brick though, and I used one of these jacks (link below) soldered to a 4 pin connector cut from an extension like the one pictured above. These are the tightest fitting sockets I've ever used, and the connection seems pretty secure. I haven't had it up long though, so I can't vouch for their durability long term:

Amazon.com: Tegg 5pcs DC-099A DC Female Panel Mount Charging Wire Threaded Socket Jact Connector with Dustproof Plug IP67 68 Water-Proof Large Current Power Adapter 5.5x2.5mm: Home & Kitchen
 
Last edited:

noduck

Member
Sep 12, 2020
41
13
8
Wow, thanks. I missed that the P4 connector can be used as the only power.

There are various sources for the P4 connector. mini-box.com even has a barrel to P4 cable (P4-DC Jack Cable). I could use that with a regular (barrel) 12V supply.

I am not confident that any of the traditional 4 pin Molex (used for drives) are reliable (and any 5V that it should have would go unused).
 

noduck

Member
Sep 12, 2020
41
13
8
Any suggestions for how to close the PSU holes in the case? I would prefer the airflow from the single fan to go to the PCIe card, instead of leaving the case through another route.
 

Markess

Well-Known Member
May 19, 2018
1,187
806
113
Northern California
Any suggestions for how to close the PSU holes in the case? I would prefer the airflow from the single fan to go to the PCIe card, instead of leaving the case through another route.
I've blocked the PSU opening in a couple cases when I had to install motherboards with onboard power. I have access to a laser cutter, so I was able to cut something pretty easily from acrylic, including a hole for a power jack when needed. If you don't have access to a laser cutter, its still pretty easy to fabricate a piece from 1/8" (3mm) acrylic with hand tools and a drill.

You can cut a piece to the size of the mounting end of the PSU, then drill holes in the same spot as the PSU would screw in to the case and attach with short machine screws & nuts. You can tap threads in acrylic, but its not the easiest thing, so machine screws and nuts are easiest. When drilling, go slow with almost no pressure. If you go fast, or push hard, the acrylic can crack. To cut a piece down to size, a hacksaw or similar saw works well. You can score and snap acrylic, but I tend to just cut it through with a saw when I'm fabricating by hand. Less chance of it cracking.

I can usually use cheap pieces from the scrap bin at a nearby plastic shop (a chain store in my region: TAP Plastic). They cut their scrap into rough squares that are big enough for a PSU "blank", or disk mount, or fan mount, or etc. I use a lot of acrylic in my systems and my other pastimes.

If you try this, just make sure you're getting acrylic and not poly-carbonate. The two look alike, but poly-carbonate is much more prone to static.
 
Last edited:
  • Like
Reactions: abq and Marsh

noduck

Member
Sep 12, 2020
41
13
8
I've blocked the PSU opening in a couple cases when I had to install motherboards with onboard power. I have access to a laser cutter, so I was able to cut something pretty easily from acrylic, including a hole for a power jack when needed. If you don't have access to a laser cutter, its still pretty easy to fabricate a piece from 1/8" (3mm) acrylic with hand tools and a drill.
Wow, that sounds pretty involved.

After some further testing, I found that cooling is actually slightly better with the PSU openings unblocked. I was able to securely mount the barrel plug in the corner of the PSU opening.

I did get the barrel to P4 cable from mini-box and it works well (just the right length). The barrel connection is snug. Now using a traditional 12V adapter (also mini-box), but using a shorter mains cable to cut down on clutter.

At this point, I believe my build is finished, and meets the goals: firewall, low power, 10G network.

Thanks!
 
  • Like
Reactions: ru me and Markess

jabuzzard

Member
Mar 22, 2021
58
24
8
I've blocked the PSU opening in a couple cases when I had to install motherboards with onboard power. I have access to a laser cutter, so I was able to cut something pretty easily from acrylic, including a hole for a power jack when needed. If you don't have access to a laser cutter, its still pretty easy to fabricate a piece from 1/8" (3mm) acrylic with hand tools and a drill.
Hum, that is IMHO the wrong approach. What you do is take a random PSU of the appropriate size. It does not need to be working so you could take it from a scrap bin. Open it up and then gut it. Cut a piece of FR4 to the same size as the PCB and drill mounting holes in the same place. Now go to Digikey, RS, Mouser, Farnell etc. and buy a 4"x2" or 5"x3" 12V open frame PSU of an appropriate capacity. Drill mounting holes in the PCB bolt on some stand offs and mount the PSU. Most of them have headers for powering a fan if you want to do that. Hook up the PSU to the C14 mains inlet and wire up. Typically they use JST VHR connectors (actually they almost all do which is good) which you can crimp with some needle nosed pliers and then add a dab of solder if you don't have the right crimping tool. I do that all the time making up custom wiring looms as I generally can't justify the cost of the crimping tools. The minimal blob of solder overcomes the issues with poor electrical contact and looseness in the plier hand crimped crimped contact

You can go up to about 150W/200W convection/forced air cooled on a 4"x2" PSU an a fair bit more on a 5"x3" PSU. You can get a 4"x2" PSU inside an SFX PSU, but a 5"x3" will require an ATX PSU.

In this manner you avoid messing about with an external PSU. Also because you are using industry standard 4"x2" or 5"x3" PSU's should the PSU fail it is easy to replace with an off the shelf replacement. The mounting holes are a defacto standard and with them all using a 3 pin JST VHR connector on the input and at least for 4"x2" a 6 pin JST VHR on the output (three pins 12V, three pins ground) it's a case of just popping the connectors and undoing four screws to replace the failed PSU. Personally I prefer wiring a fan if I use one through to the motherboard and attaching it to a fan header there. That way I can monitor it for failure.

I have done this several times now and it works a treat. It can also be used for getting power sorted in "no dremel" stealth builds. So for example I am in the process of mounting an ASUS PN50 inside a old SPARCstation IPX case, though in this case I have a custom PSU for a range of other reasons (you can turn it on with the power button on a Type 5c keyboard so needs to be a bit special) and because it's a funny shape.