Interested to know how you got on with the Noctua fan install? I am in exactly the same position myself with 2 x VEP1445's and looking at the Noctua's too but would rather not hack at the existing wires on the standard fans.Ok guys, need some clarification here. The JST 1.25mm pitch standard is JST GH. The JST 1.00mm pitch standard is JST SH. I understand we're only talking 0.25mm here, but which one is accurate for the device? I really don't want to go cutting any existing cables, I'd rather buy a cable preterminated with the JST female adapter and add molex male adapter to it so I can connect the Noctua. That way I can always go back to factory original if necessary.
Dell VEP/VMWare Edge/Velo Cloud SD-WAN/VeraCloud VEP1400/VEP1400-X firewall units
- Thread starter j_h_o
- Start date
Notice: Page may contain affiliate links for which we may earn a small commission through services like Amazon Affiliates or Skimlinks.
I ultimately decided to go ahead and cut the wires on the cable to the existing fan, then cut the noctua extension cable in half and scotchlok'd them together. That put the JST connector to the 3-pin male on the noctua-provided cable, then I could connect the noctua 3-pin female to that. Since I had purchased some time ago a box of scotchlok connectors, I also went ahead and wired the other half of the noctua extension to the factory fan, that way if I ever decide to pull the noctuas out, I can go back to factory, albeit spliced, configuration.Interested to know how you got on with the Noctua fan install? I am in exactly the same position myself with 2 x VEP1445's and looking at the Noctua's too but would rather not hack at the existing wires on the standard fans.
Interesting bug in my Edge640; I can't get the lights to flash on ports eth5-7 using ethtool -o and for eth5 (SFP+) I can't get the lights to flash from the BIOS, but I can get eth4 (SFP+) to flash. Turns out, the ports work, I am currently connected to both eth5 and 7 on my network and able to ssh into the box. I have tried the factory reset as well as holding down the internal button closest to the power jack.
This doesn't seem to impact anything that I can see so far, but, it would be interesting to figure out what is happening here. Anyone else see this issue (or even tried to replicate?)
This doesn't seem to impact anything that I can see so far, but, it would be interesting to figure out what is happening here. Anyone else see this issue (or even tried to replicate?)
I have a really weird problem with 2 of these devices that I am hopeful someone can help with. I bought 2x VEP1425 very cheap from a local recycler that worked fine, booted to DiagOS and Arch without issue. Went to update the BIOS and it works fine, but updating the PIC always fails. I can neither query the i2c address for it (comes back blank) or write any values to it. Running edatool gives this result:
and then further down:
I have 2 of these devices exhibiting the exact same issue. Is there something I can attempt to try to fix this? Did some of these devices just ship without a PIC? I know that their manufactured date is late 2021 but that doesn't seem all that new...I am scared to let the BIOS and CPLD go to the newest version without updating the PIC because it feels like a bad idea to not have the versions aligned. Another point - no amount of holding the reset button ever seems to initiate a factory reset.
Code:
root@dellemc-diag-os:~# edatool

*****************************

* Diagnostics Application *

*****************************

DellEmc Diag edatool version 1.4, package 3.43.4.81-26 2022/12/08

BIOS version:

3.48.0.9-11


CPLD version:

0.7


PIC version:

<blank line>
Code:
Testing I2C devices:

Checking I2C devices on bus 0:

+ Checking DDR4 SPD 0x50 ..... Passed

Checking I2C devices on bus 1:

+ Checking CPLD 0x31 ..... Passed

+ Checking PIC 0x2d
Error reading at offset 0x00
..... FAILED <<<---
Last edited:
@awilson13,
So you can't do a factory reset and the diagnostic tools report no PIC? Does a simple press of reset still trigger a reboot?
How's your network connectivity? Do all or some of the ports work? There's an RGB LED on the front. Does that light up?
The system has dual BIOS slots. I've been able to go forward and backward with BIOS versions. I've never tried the same with CPLD/PIC.
I think you should just try to work with the systems as they are. It does appear that something is corrupt/broken. Maybe someone plugged in the wrong adapter and the PIC got fried? Most of these boxes were running a proprietary VMware OS that handled updates. Maybe one of those updates left the device in a bad state. I haven't heard about your specific issues before.
Regarding the factory reset, it never prints anything to the console when I hold the button down. Holding the inner button down closest to the power jack appears to do something resembling a factory reset (I get a lot more output and it takes a lot longer to restart). Pressing the reset button does trigger a reboot without issue. The PIC is still controlling the front LED and the fans fine, they change how you would expect BUT interacting with them from the OS never works.@awilson13,
So you can't do a factory reset and the diagnostic tools report no PIC? Does a simple press of reset still trigger a reboot?
How's your network connectivity? Do all or some of the ports work? There's an RGB LED on the front. Does that light up?
The system has dual BIOS slots. I've been able to go forward and backward with BIOS versions. I've never tried the same with CPLD/PIC.
I think you should just try to work with the systems as they are. It does appear that something is corrupt/broken. Maybe someone plugged in the wrong adapter and the PIC got fried? Most of these boxes were running a proprietary VMware OS that handled updates. Maybe one of those updates left the device in a bad state. I haven't heard about your specific issues before.
I appreciate your feedback you are very likely right that I should stay on the BIOS revision that is working. The issue with that is I didn't notice this problem was happening until the BIOS updater had already flashed the new BIOS (it didn't properly detect the absence of a PIC and just kept flashing anyways), so I downgraded the BIOS back to an old version. Further difficulty there is that it isn't quite the same version as it had when i got it (3.48.0.9-11 vs 3.48.0.9-12 which is on the backup BIOS chip still) so it throws a DXE Core missing error, reboots ~5 times or so, and eventually boots the backup BIOS. I am debating whether or not to try to get the 9-12 BIOS version off the secondary chip using a serial adapter and flash it back to the primary (because Dell didn't make 9-12 available anywhere...) or to just leave well enough alone and deal with the horrendously long boot times and errors. As far as I can tell once it is in OS, everything works fine. Very odd to say the least, I read every single post on this thread and haven't seen anyone having the same issues so you are likely right that mine is damaged in some way. The only thing that makes me wonder is I have 2 here that are exhibiting identical symptoms which makes the damaged theory less likely, but not impossible.
Very much appreciate you responding though it helps
")
Last edited:
@awilson13,
I encountered a similar DXE error and boot sequence when I removed the Wi-Fi module to swap for an NVMe drive. I was able to change some flags in NVRAM to modify the POST. Maybe you can do something similar.
I encountered a similar DXE error and boot sequence when I removed the Wi-Fi module to swap for an NVMe drive. I was able to change some flags in NVRAM to modify the POST. Maybe you can do something similar.
This started me down a wild goose chase that ended in me fixing it (you deserve all the thanks!) Playing with the NVRAM values from Ubuntu I noticed that none would ever stick, and when I made changes to the BIOS, the same thing would happen. Coupled with the difficulties getting it to factory reset, I made the choice to try to flash the Winbond chips directly using a CH341A and clamp, starting with the secondary chip on the back and ending in the front one. I flashed to a very old version of the BIOS just to be as safe as possible. Once I did that, the device very obviously factory reset, and I was able to reboot into DiagOS where the PIC is present suddenly. I was able to then fully upgrade every component and bring these devices back to life.@awilson13,
I encountered a similar DXE error and boot sequence when I removed the Wi-Fi module to swap for an NVMe drive. I was able to change some flags in NVRAM to modify the POST. Maybe you can do something similar.
Extremly huge thanks to you and I very much appreciate your kindness and help.
@awilson13,
I was the one who told you to leave things alone. What you did is reasonable, but the clip had to make contact, there could have been power issues, and the BIOS image could have been some intermediate form. You got really lucky.
I was the one who told you to leave things alone.
What you did is reasonable, but the clip had to make contact, there could have been power issues, and the BIOS image could have been some intermediate form. You got really lucky.I am much more skilled with electronics work than I let on! Also one of them was effectively bricked with it just fully bootlooping so starting with that one was basically reviving some ewaste. Either way, everything is fixed and I appreciate the assist.@awilson13,
I was the one who told you to leave things alone.
I just picked up a couple of Edge 640 boxes off ebay. They didn't have a bios password set and they still seemed to have the system software still installed. I was having a heck of a time getting the Diagnostics OS to install on the eMMC. I tried making a sysrescuecd USB and wiping the partitions as suggested but that didn't work either. I finally tried turning off CSM in the BIOS and rebooting and that ended up working on both of them. After that I was able to install the Diag OS and then run the firmware flasher. I didn't remember seeing that when I first read through the thread so I figured I'd share in case anyone else runs into that.The 620 shares the same firmware with 640/680. You're good.
Here's how I would proceed:
1) Create a USB drive with a live Linux distribution like Finnix. This will allow you to poke around the internal file systems. You will want to add console=ttyS0,115200 to grub.cfg.
2) Create a USB install from Dell Diagnostics OS V3.43.3.81-27 for VEP1400-X Switch.
3) Copy the vep1400x_ufw_2.5 file from VEP1400_UFW2.5_External.zip to one of your USB drives.
4) Apply power [12V 5A 5.5mm x 2.1mm(2.5mm for 680)]. You can manage with less than 5A. I haven't tested to see how low.
5) Connect a micro USB cable to the back of the unit and open a terminal (PuTTY) on the corresponding port.
6) Momentarily press reset. After the memory tests, press [Delete] to enter the BIOS and select your USB drive as boot.
7) Install Diag OS to the eMMC. If this fails, use your live Linux to remove any existing partitions from the eMMC and/or SATA. You may also want to create a USB drive with Diag OS. That way you could use the (tiny) 16GB eMMC for something else.
8) Run ./vep1400x_ufw_2.5 interactive from within Diag OS (root/calvin). Updating the CPLD or PIC requires a reboot. New BIOS will take a long time to 'initialize'. Not to worry.
9) Once BIOS/CPLD/PIC have been updated, press and hold the external reset button until you see Factory Reset on the console. Not sure this is actually necessary. Instead, you may need to press/hold the button inside closest to the power jack. Something triggers DXE which is what initializes all 8 network ports.
10) Reenter the BIOS (password <service tag>! ) and tweak settings. I just disabled most of the fancy stuff. You can remove the password by changing to blank.
You now have a fairly standard x86 box with no display. You may have to install your target OS to external media and then copy the image. I did that with OpenWrt. I think the easiest solution is to swap the Wi-Fi module (assuming you have one) with an NVMe. You can then install to the NVMe using a PC.
Ok, this is driving me nuts. Got lucky with a $50 Edge 680 a couple weeks ago, and doing the usual firmware updates, and I've run into a wierd problem trying to do the DiagOS install to eMMC. It appears DiagOS installs fine, but it's failing on the grub install.
I went through the detailed process back in this forum on what to do (adding the --force to several commands in install.sh), but it still fails on the grub install. I'm about to go ahead and build a USB so I can proceed forward with the box, but has anyone else run into this?
Code:
Installing grub for diag-os
ERROR: grub-install failed on: /dev/mmcblk0
Installing for i386-pc platform.
grub-install: warning: this GPT partition label contains no BIOS Boot Partition; embedding won't be possible.
grub-install: warning: Embedding is not possible.  GRUB can only be installed in this setup by using blocklists.  However, blocklists are UNRELIABLE and their use is discouraged..
grub-install: error: will not proceed with blocklists.
Removing /tmp/tmp.jkCJmE
Failure: Unable to install image: /diag-installer-x86_64-dellemc_vep1400_c3538-r0-3.43.3.81-27-2022-12-08.bin
This should be not reachable unless something wrong is there!!!!!It was probably doing something silly where it used the wrong partition format due to the way it booted. In theory, an EFI-booted system should do an EFI install, and a MBR-booted system should do an MBR-install. But if the installer mixes that up (or if a tool like Rufus does a MBR-chainload from GPT) it tries to do an MBR-install on an EFI-system (or: MBR bootsector on an GPT partition table, which doesn't work).
Yeah, that's my guess. It's happily booting to eMMC now.
Ran into the same issue previously mentioned about losing the i350s after updating to the latest BIOS and such. And, the copper-based ixgb ports wouldn't initialize under either pfsense or esxi either. Beat my way through pressing the reset buttons... first holding down BOTH of the inside buttons until the unit powered off, then holding down the factory reset button after the next boot... and now I have all the NICs available again. About to reinstall the Dell Custom ESXI image again.
Just curious, has anyone tried any larger ECC SODIMMs than the 16GB that is currently installed to give the 680 32GB? (and no, I haven't read back through all the pages of this thread yet, I'm about to do that)
Edit: Ahh, question answered in post #6 on page 1. It will take at least a 32GB SODIMM.
The required memory would probably cost almost as much as you paid for the base unit. This is why I always recommend paying a little extra for a 640 over a 620. 32GB is really nice, but anything more is probably overkill? I do have a 1TB SATA and 1TB NVMe installed in place of the Wi-Fi.has anyone tried any larger ECC SODIMMs than the 16GB that is currently installed
Is this the listing you won? I said I wasn't going to buy any more, but I might have if I'd seen my saved search sooner. Did you look up the service tag to see when your unit was shipped?
Yep, that's the one I've got. The saved search email hit my phone one morning and I jumped on it quickly. Support on the tag ended Jan 2022, so it wasn't too old. It's got the WLAN module in it, but I've decided I really don't need the extra disk or RAM in it. I do have ESXI running on it though, so I can put a couple small VMs onto it.Is this the listing you won? I said I wasn't going to buy any more, but I might have if I'd seen my saved search sooner. Did you look up the service tag to see when your unit was shipped?
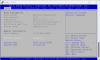
I keep getting "BIOS image does not match target platform" when I run the latest 2.5 updater. My box has 32 gigs of RAM and a 128 gig SATA drive. The box is white and only has Dell EMC printed on it. I haven't gotten the ports to show in opnsense or proxmox with the serial installer.
Any ideas?
Any ideas?
This is what the bios shows. Bottom of the unit doesn't have any labels other than the MAC address, service tag and the 2 fan vents.
Attachments
-
 83.2 KB Views: 26