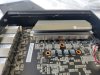
I think the "variant c" is the most benefitial of them all by the look of it regarding thermals.
Problem is that there seems to exist variants within these variants but if yours will have heatpipes its of course a better option than to not having that as my unit do (which is a variant of variant b with the Y fins).
Regarding mounting I would try to repaste the unit also to verify that you dont have that gap between the CPU and the heatsink as some have reported (mine didnt seem to have it but I repasted my unit anyway using Thermal Grizzly Kryonaut). Note that there are thermal paste both between the copper block (or whatever it is) and the heatsink aswell as between the copper block and the CPU. If yours have a gap either RMA the unit or use one or more shims to fill that gap. Another solution is of course to use a high quality thermal pad (instead of shims + thermal paste) but they rarely have better performance than thermal paste since the point of using each is to have material instead of air between the heatsource and the heatsink. Where is material itself is still worser than perfect contact between the heatsource and the heatsink.
To get rid of the old thermal paste just use isopropanol to wipe that off before applying new thermal paste.
Then when you mount it verticially I would prefer to have those "valleys" verticial. That is in your picture having the ports facing either straight up or straight down. This way the little airmovement when air gets heated up by the heatsink will help, even if its very little, to produce a drag over these fins instead of "trapping" the heat which would be the case if those fins would be horizontal.
The most critical parts of these units seems to be BIOS settings where enabling ASPM and adjusting both CPU and Platform PL1 and PL2 seems to be what helps most.
Depending on CPU that you select you should set PL1 and PL2 to the same value. Yes this will effectively disable turbo boost but at the same time you will have control of both the performance AND powerusage and by that heat produced.
For a N100 I would go for 6W (value 6000 in the BIOS) and for a N305 (or the newer N355) I would go for 15W (value 15000 in the BIOS) which matches the TDP defined by below datasheets:
Intel® Processor N100 (6M Cache, up to 3.40 GHz) quick reference with specifications, features, and technologies.

www.intel.com
Intel® Core™ i3-N305 Processor (6M Cache, up to 3.80 GHz) quick reference with specifications, features, and technologies.
www.intel.com
Intel® Core™ 3 Processor N355 (6M Cache, up to 3.90 GHz) quick reference with specifications, features, and technologies.
www.intel.com
Another critical part is the compartment where the NVMe and SSD is located.
Here you need to test if you can manage this without a fan or not. Another workaround is to remove the bottomplate so the heat can escape on its own (which probably isnt an option for you).
Putting heatsinks on NVMe's will help some but without some airmovement (using a fan) the help from using heatsinks on the NVMe will be minimal, specially if you like me have 2x NVMe located in that area.
There are NVMe's which by reports seems to produce less heat than others (they are more aggressive in powersaving).
For example the SK Hynix Gold P31 and Platinum P41:
1 TB, TLC, PCIe 3.0 x4, M.2 2280

www.techpowerup.com
1 TB, TLC, PCIe 4.0 x4, M.2 2280
www.techpowerup.com
Aswell as the Solidigm P41 Plus and P44 Pro
1 TB, QLC, PCIe 4.0 x4, M.2 2280
www.techpowerup.com
1 TB, TLC, PCIe 4.0 x4, M.2 2280
www.techpowerup.com
Using a heatsink such as Be Quiet MC1 PRO is probably a good thing anyway:
be quiet! is a premium brand manufacturer of power supplies, cases and cooling solutions for your desktop PC.

www.bequiet.com
And if you select a SATA SSD you should check up their power usage aswell.
Kingston DC600M and DC600ME seems to be decent and they also have PLP (Power Loss Protection):
960 GB, TLC, SATA 6 Gbps, 2.5"

www.techpowerup.com
When it comes to fans you can select either one thats mounted on the inside of the bottom plate or the outside of it.
If you go for being mounted on the inside you can connect it to internal PWM connector and have that being managed by the BIOS (or some software in your OS) or if using external you can use for example the Noctua NF-A8 5V PWM which comes with a USB-adapter:
The NF-A8 5V PWM is a PWM-enabled 5V variant of Noctua’s award-winning, premium-quality NF-A8 80mm fan. Featuring an AAO (Advanced Acoustic Optimisation) standard frame and sophisticated aerodynamic design measures such as Flow Acceleration Channels, the NF-A8 is renowned for its superior...

noctua.at
If you will use a SATA SSD that will be mounted on the bottom plate so you then cant have an internal fan.
And no matter if you use an internal or external fan for it to be effective it will also need somewhere to get rid of the heated air so if you will wallmount your unit you would need to get some, I dunno what the technical term is, distance brackets to create a gap between the unit and the wall itself.
Using a VESA mount will most likely just trap the heat within the box and a workaround for that would be to use a 12cm fan and strap that to the heatsink fins (the part that will be pointed outward facing you when you use a VESA mount on the bottom plate) but most effective way to lower the temp in the RAM/SSD/NVMe compartment is to have a fan directly in that area to remove the heated air.
After all no matter which setup you end up with verify the thermals by running Memtest86+ for some hours (which will also confirm that the CPU and RAM is fine) and then take a look at the temperatures of your storage devices. NVMe's will go into readonly mode when their temp passes about +85C (+185F).
I would boot Memtest86+ using a USB, same with verifying the temps afterwards then I would USB boot SystemRescue to verify that:
Memtest86+ is an advanced, free, open-source, stand-alone memory tester for 32- and 64-bit computers (UEFI & BIOS supported)

www.memtest.org
")
pan.changwang.com