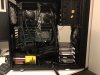
with my NZXT H500 build I thought about using the nylon standoffs and you are spot on with the issue in the upper left corner. Its a bugger.
The GA-7PESH2 had 6 of 11 standoffs line up with existing positions, 2 top center, 2 left side in the card bay, and 2 bottom center. The SM board I have had 5 I think.
I've got about 7 or 8 small baggies of brass and plastic standoffs from building PC's for folks back in the 90's. I went back and forth on the nylon standoffs. they were definitely an easier route to go.
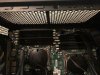
But I really wanted the entire top row to be fixed to the tray as I was worried about the weight / stress of the board on only two upper standoffs.
I was not really able to correctly get a drill bit in the upper left and tapping the hole using a hand-tap just didn't work there so I ended up drilling two adjacent holes and filing a short slot for the standoff to "find the right position" and then I put a nylon jam nut on the back of the standoff to hold in place. I was very pleasantly surprised by the rigidity of the other hand tapped holes given the thickness (or lack thereof) of the motherboard tray's steel, I still used jam nuts on every single one of them.
I had added a couple of stand offs before in the old days but never 5 in 1 case. Biggest challenge for me was I *knew* I wasn't going to be perfect, eyes too old, measurements just a little inconsistent so trying to fudge enough play in the process was key.
If you make mistakes hopefully they will cancel out but really they're more likely to add up and leave a standoff totally out of alignment.
The nylon standoff solution avoids that.
Ultimately I used a very old spare x16 GPU to help line up the motherboard when I marked the holes for drilling and REALLY took my time, agonized and measured and mark I eyeball'ed in between despite the risk of pulling and putting the motherboard in repeatedly. I still made a mistake but not fatal.
if I get some time and there is interested I'll put up a post in the DIY workstation on the process I used which is really an amalgamation from lots of other folks - so nothing original. Inspiration came from from the SZ340 build here and ThomasZ's SZ340 build and the fact that I like small mid-towers.
there are a couple of techniques to keep in mind:
1) use a sharp punch to give yourself an indent to keep the drill bit from walking.
2) start with the smallest drill bit you have / less chance of walking bit
3) then start using larger bits to enlarge the hole
4) keep in mind, the mounting holes in motherboards have some tolerance, so it doesn't have to be machine precise; you can probably be off my 1mm or so and still be okay.
if precision isn't your thing, or you have shaky hands or any other reason, a "workaround" is to use standoffs with longer machine threads and use a nut on the backside to hold the standoff threads. Then just drill a hole that is larger than the threads. even if it is off center, since you are not threading into the sheet metal but the nut behind it, you give yourself a lot of "play" room to move the standoff into a good position.
as for hard to reach locations on the board, a lot of times the motherboard mounting surface can be removed from the case, or you can disassemble the rear window. there are also tools to help get into tight spaces.