Hi,
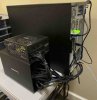
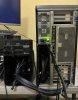
I just successfully added the Broadcom 9600-24i card connected to ICY Dock MB699VP-B V3 Mobile Rack via (2) OCuLink cables on my Dell T7920 TrueNAS system running TrueNAS-SCALE-24.04-BETA.1 (Dragonfish). I am trying to build an All-Flash NVME U.2 TrueNAS system that is quiet, reasonably fast, and “economical”, made mostly of spare parts that I already have. Under this configuration, each drive is getting PCIe 3.0 x 4 NVMe bandwidth, accommodating drives up to 15mm in height. Unfortunately I am limited by PCIe 3.0 speeds as well as the Broadcom card Tri-Mode performance bottleneck on my older Dell T7920 system. I have up to (5) available PCIe 3.0 slots on this Dual CPU system for HBA cards, allowing up to a theoretical maximum of (20) U.2 drives (if using 9500-16i cards), with each drive connected at PCIe 3.0 x 4. These cards do not use a PCIe switch like the P411W-32P cards. Obviously, the additional (3) ICY Dock Mobile Racks would require a separate external 5.25 inch enclosure given the limited space of the Dell T7920 workstation. In my current setup, I have one ICY Dock mobile rack up front in the 5.25 slot and a second mobile rack in back lower part of the case, just below the power supply. Mounting mobile racks in the Dell case required some ingenuity, including 3M red double sided foam sticky tape, heavy duty adhesive velcro strips, and adhesive plastic shims. 3d printing a mounting structure may help in the back of the case. I have updated firmware/bios to current or working versions on all Broadcom cards tested. Use case will be heavy data archiving, benefiting from speed and reliability of NVME drives.
Ideally, I would like to use a direct NVME hardware access server that optimizes the potential of each NVME drive, several of which are likely proprietary in design. The UBM (Universal Backplane Management) implementation by Broadcom is an attempt to standardize NVME backplane architecture. For this build, I of course used the existing backplane in the ICY Dock device which supports Tri-Mode HBA Controllers.
An alternative enclosure includes the Serial Cables enclosures as seen on recent Storage review article and YouTube video, website Serial Cables, SAS Cables, SATA Cables, MiniSAS Cables, IPass Cables, IPass Adapters, MiniSAS Adapters, SAS Adapters, SATA Adapters, Serial Cables, Adapters and Accessories from Serial Cables.
Broadcom MegaRAID 9670W-16i RAID Card Review
NVME U.2 rack systems:
Supermicro SYS-220U-TNR server that Storage Review did a short video on.
Supermicro 2114S-WN24RT
Gigabyte R282-Z94

 www.gigabyte.com
Multiple older Gigabyte Dual EPYC R282-Z92 PCIe 3.0 servers are available on Ebay from China at reasonable prices, ranging from $2000 and up.
www.gigabyte.com
Multiple older Gigabyte Dual EPYC R282-Z92 PCIe 3.0 servers are available on Ebay from China at reasonable prices, ranging from $2000 and up.
TYAN Transport HX TN85-B8261 Review
 www.tyan.com
TYAN Transport HX TN85-B8261 Review
www.tyan.com
TYAN Transport HX TN85-B8261 Review
Lastly, 45 Drives is coming out with an All-Flash Stornado F2 server. They are using the Broadcom 9600-16i card in their current F2 Stornado and offer the server in both Intel and AMD variants. The AMD cpus can offer high count PCIe lanes with just one CPU. Despite the fact that the F2 uses the 9600-16i Broadcom HBA Tri-Mode card, this system may benefit from their dedicated in-house developed UBM backplane. I look forward to seeing how this server performs. Very exciting innovative products coming out of this company, which also develops and produces the high quality cases used in the servers.
45Drives - Big. Strong. Fast. Storage Servers..
It will also be interesting to see some coming reviews of the iX systems upcoming F100 All-Flash Flagship TrueNAS server which runs TrueNAS Scale.

 www.truenas.com
The following server below closely resembles the TrueNAS F100 All-Flash server.
www.truenas.com
The following server below closely resembles the TrueNAS F100 All-Flash server.
Viking Enterprise Solutions VSS2249P storage server
 www.vikingenterprisesolutions.com
vss2249rq-download-center - Viking Enterprise Solutions Manuals
www.vikingenterprisesolutions.com
vss2249rq-download-center - Viking Enterprise Solutions Manuals

 www.storagereview.com
https://www.reddit.com/r/StorageReview/comments/xip0wx
www.storagereview.com
https://www.reddit.com/r/StorageReview/comments/xip0wx
"The Viking Enterprise Solutions (VES) VSS2249P storage Server offers 24, 2.5-inch U.2 (SFF-8639) SSDs utilizing the PCIe Gen 4 NVMe interface combined with two server modules equipped with AMD EPYC Rome CPUs. This is a dual-node system: each server has access to 12 NVMe SSDs via x4 PCIe Gen 4 lanes for optimum performance."
"The Viking Enterprise Solutions VSS2249P is a 2U dual-node storage server featuring 24 bays for single port U.2 PCIe v4 drives. More specifically, each server node (or module) supports 12 single-port, hot-pluggable NVMe 2.5-inch U.2 (SFF-8639) SSDs via x4 PCIe Gen4 lanes, making this a performance-driven server."
"The VSS2249P uses similar nodes on the backend, although 12 SSDs are direct-connected to one node, with the remaining 12 to the other. This gives each SSD a full 4-channels of PCIe Gen4 lanes back to the node it is connected to."
"This isn’t a trivial issue; the single-ported drives will perform best in a solution that can deliver four PCIe v4 lanes from one of the AMD server nodes to each drive. Direct access offers the highest performance from each SSD, as opposed to flowing through an internal expander that can limit bandwidth. Additionally, this system is designed for single-ported SSDs, like Solidigm P5316, compared to the review from the previous Viking Enterprise Server that was designed for dual-ported SSDs."
Viking Enterprise Solutions (VES) VSS2249P architecture block diagram

Now back to the DIY build. Compared to my other rack servers, this setup is relatively “quiet”, currently sitting in my office closet. With the ICY Dock fan speed to low (middle setting), the NVME drives remain relatively cool or slightly warm to the touch. The 9600-24i card however is running really hot in my Dell T7920 case with default fan speeds.
Although the system is running well overall, I am unable to get the 9600-24i to post to BIOS/display BIOS Splash Screen like I am able to do with the 9500-16i cards. Fortunately, this is not necessary with the TrueNAS system. I tried changing the Dell UEFI and Legacy BIOS settings with no luck. Is this typical of the Broadcom 9600 HBA series? Is there a card option I can turn on or off? Is this a built-in security option? The card also works well with Windows 11 Pro. As a result of not posting to bios, I cannot boot off any disks attached to the 9600-24i card. The card otherwise loads well with the included Beta 1 Dragonfish driver.
https://www.reddit.com/r/DataHoarder/comments/182b0ar
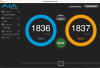
Although the 9600-24i card adds an additional SlimSAS connection for a total of 3 ×8i SFF-8654 ports, the peak speeds on this card (roughly 2000MB/sec write and 2000 MB/sec read on single drive in non-redundant stripe mode) are very similar to the 9500-16i card, which has (2) SlimSAS ports. Given the similar speeds (on PCIe 3.0 system at least) and large price differential (9600-24i $936.99 vs 9500-16i $300 on Amazon), it’s probably best to just use the cheaper 9500-16i in your build with multiple HBA cards. I currently do not have a PCIe 4.0 system for testing.
I also have the P411W-32P card ($700+ card on Amazon), which has already been documented on the Level 1 Tech forum to not work with the ICY Mobile Rack using most current Broadcom firmware versions 4.1.3.1 and 1.8.4.0. I had the same experience with the most recent 1.8.4.0 firmware. The card does however work with the ICY Mobile Rack if the card's firmware is rolled back to version P14.2 (Version 4.1.2.1) dated 2/24/2021 as found in Broadcom's firmware archive. I have confirmed this combination works with my setup with firmware version 4.1.2.1.
This was mentioned on Level 1 Tech forums, “the P411W-32P works with the MB699VP-B V3 with all firmwares up to including the package listed as P14.2 on Broadcom’s site.”

 forum.level1techs.com
Contrary to a post in the Level 1 Tech forum stating that you have to delete the current firmware before you rollback firmware, I was able to just run the g4Xflash_x64 program without first erasing firmware. One user on the forum bricked his card after deleting the card's firmware. I just used the firmware program with the 4.1.2.1 firmware to "overwrite" the newer firmware with the old firmware.
As mentioned in another post, do not flash this card with the firmware provided by ICY Dock as a member of Level 1 Tech forums bricked his card. All acceptable firmware has to be "signed" authentic Broadcom firmware available on their website.
forum.level1techs.com
Be warned that once you downgrade this card's firmware to 4.1.2.1 on a Windows 11 system and you install the most recent Broadcom Windows drivers, your Windows operating system will crash on boot up with the Blue Screen of Death. To repair your Windows 11 operating system, you then have to physically remove the P411W-32P Broadcom card from the computer and then delete all the Broadcom hidden devices and drivers as mentioned in the post below. Go into Windows Device Manager, show hidden devices and uninstall all Broadcom storage controller entries and be sure to check the option to also delete the driver files.
forum.level1techs.com
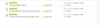
After removing the hidden Broadcom devices and drivers, you then have to delete/move all (3) instances of the ltSas35i.sys driver (see picture below). I just moved my instances of the ltSas35i.sys files to a junk folder on the desktop. I did not touch the ltSas35.sys files. This was successful in restoring Windows 11 back to working state. My advice is to not update any Windows Broadcom drivers for this card. The default automatically loaded Windows driver version 2.61.29.80 dated 7/21/2017 works just fine.
forum.level1techs.com
 forum.level1techs.com
The card however works fine with Ubuntu and presumably TrueNAS with the 4.1.2.1 firmware version. I use Windows to update card firmware and check settings on this card. The card is now "locked into" the older 4.1.2.1 firmware version until I hear of any new full functional firmware versions, which is unlikely since Broadcom is trying to force this card to comply with its UBM backplane standard. Very crappy driver support from Broadcom, with Level 1 forum post above clearly showing the pain this card has caused so many users.
By the way, be careful to buy only authentic Broadcom versions of these cards as there are a lot of cheap Chinese counterfeit “Broadcom” cards on Ebay which look almost exactly the same as the authentic card but can have firmware and other hardware limitations. The Art of Server YouTube channel has several videos on this subject.
So far TrueNAS Dragonfish Beta 1 is super stable with no instability or detectable bugs so far.
This statement below from TrueNAS regarding TrueNAS SCALE hints at where future development of this system is going.
“TrueNAS SCALE has inherited the storage functionality and automated testing from CORE. SCALE has matured rapidly and offers a more robust apps environment based on Linux Containers & KVM. TrueNAS SCALE is generally recommended for new users that need embedded apps, and will gradually become the recommended version for all new TrueNAS users.” The upcoming iX Systems flagship All-Flash F100 server will run on TrueNAS Scale.
TrueNAS SCALE Dragonfish Reaches BETA
iX Systems and the Debian Linux development team did a great job with this beta release - super stable and feature rich.
My test system:
Dell 7920 Firmware 2.38.0 (Current)
Dual CPU Intel Xeon Gold 6258R @ 2.70GHz (2nd CPU adds 2 additional PCIe 3.0 x 16 slots), bought on eBay.
512 MB Ram - NEMIX RAM 512GB (8X64GB) DDR4-3200 PC4-25600 ECC RDIMM Registered Server Memory Upgrade for Dell PowerEdge T550 Tower
(1) Mellanox MCX613106A-VDAT 200GbE Card, plugged into PCI slot #5, connected at 100GbE to an Arista 100 GbE Switch
(5) Broadcom 9500-16i, slots #2, #3, #4, #6, and #7 (when completely setup), bought on Amazon.
(4) DiliVing SlimSAS 8X to 2*oCulink 4X,SFF-8654 74pin to 2*SFF-8611 36pin Cable 80cm(Broadcom MPN 05-60001-00), bought on Amazon
(2) ICY DOCK 4 x 2.5 NVMe U.2/U.3 SSD PCIe 4.0 Mobile Rack for 5.25" Bay with OCuLink | ToughArmor MB699VP-B V3, bought on eBay, shipped from Hong Kong, China. Be sure to get this particular V3 model which supports Tri-Mode Controllers and accommodates 15mm U.2 drives.
 If you want to use M.2 NVME drives in the U.2 bays, you can use this adapter.
ICY DOCK M.2 PCIe 3.0/4.0 NVMe SSD to 2.5" U.2 SSD Converter / Mounting Adapter with Heatsink | EZConvert MB705M2P-B
(2) U.2 NVME SSD Hard Drive Expansion Interface Backplane Kit Compatible with Dell Precision 7920 T7920 Tower Workstation 076W3N
(1)M.2 SAS Flex Bay Module Compatible with Dell Precision T5820 T5820XL T7820 T7820XL T7920 T7920XL 066XHV 66XHV w/Tray Without SSD only for M Key 2280 M.2 NVMe (PCIe Gen3 x4) SSD
(1) SAMSUNG 980 PRO SSD 2TB PCIe NVMe Gen 4 Gaming M.2 Internal Solid State Drive Memory Card MZ-V8P2T0B/AM (TrueNAS is installed on this M.2 drive.)
(4) Intel D5-P4326 Series 15.36TB U.2 NVMe/PCIe 2.5" QLC SSD Solid State Drive, bought on eBay, $850/per drive new. I will add more drives as budget allows.
(2) SOLIDIGM D5-P5336 30.72 TB Solid State Drive - 2.5" Internal - U.2 (PCI Express NVMe 4.0 x4) - Server Device Supported - 0.56 DWPD - 3000 MB/s Maximum Read Transfer Rate, bought on Tech America, $2506/per drive new. I will add more drives as budget allows.
Video Card VisionTek Radeon RX550 4GB GDDR5 (Plugged in the small PCIE Gen 3 x8 open ended slot #1 as I only need minimal video ability to view TrueNAS startup text and IP address.
As mentioned above, this Dual CPU system setup allows for a maximum of (5) Broadcom HBA cards.
Benchmark Testing:
AJA System Test Lite, run off 2019 Mac Pro, connected at 100 GbE via Atto FastFrame 3 N312 Ethernet Card.
Additional items used in this build include the following:
SABRENT USB 3.2 5 Bay 3.5" SATA Hard Drive Tray Less Docking Station (DS-SC5B)
High quality 4mm thick Aluminum housing, very well made
https://www.amazon.com/gp/product/B07Y4F5SCK/ref=ppx_yo_dt_b_search_asin_title?ie=UTF8&th=1
Seasonic PRIME-FANLESS-TX-700
You can also use a smaller power supply in the back of the Sabrent case for a cleaner look.
Not entirely necessary as the Dell T7920 could provide adequate power with the appropriate sata power cables
https://seasonic.com/prime-fanless-tx
https://www.amazon.com/dp/B087Z71TB...0QRP2N2R&psc=1&ref_=list_c_wl_lv_ov_lig_dp_it
(1) YEZriler 10 Pin ATX EPS PSU Jumper Bridge Tool Test Starter for Seasonic Modular PSUs
https://www.amazon.com/dp/B0B2HYZN3C?ref=ppx_yo2ov_dt_b_product_details&th=1
(3-Pack) YEZriler 18 Pin ATX EPS PSU Jumper Bridge Tool Test Starter for Some Specific Types of Corsair Modular PSUs with 18 Pin + 10 Pin Ports
A total of (4) jumpers across these 2 connectors allows you to jumper the power supply directly instead of using a large assembly of Seasonic jumper plug at the end of the supplied motherboard cable for a cleaner look. I used a multimeter continuity tester to "replicate" jumper settings from the supplied motherboard cable with Seasonic jumper in place. Obviously double check your jumper placement with continuity tester as this may vary between ATX power supplies.
JRready ST5255-05 Pin Extractor Tool Kit, Terminal Removal Tool with 5PCS Replacement Tips, for Molex Mini-Fit Jr., Micro-Fit 3.0,3P/4P PC Fan, AMP Micro Mate-N-Lok Series Connectors
https://www.amazon.com/dp/B0CHYM3YQV?psc=1&ref=ppx_yo2ov_dt_b_product_details
You will need this Pin Extractor Tool Kit to remove and reposition pins in above ATX connectors.
(10) DiliVing SlimSAS 8X to 2*oCulink 4X,SFF-8654 74pin to 2*SFF-8611 36pin Cable 80cm(Broadcom MPN 05-60001-00)
https://www.amazon.com/dp/B0B8N9N8HC?psc=1&ref=ppx_yo2ov_dt_b_product_details
Scotch-Mount Double Sided Mounting Tape Heavy Duty, Black Extreme Mounting Tape
I used this tape to mount the (3) ICY Dock Mobile Racks together as well as mount the power supply to the Sabrent Housing.
You can then mount this ICY Dock Assembly to the Sabrent Housing via Heavy Duty Velcro Pads from Lowes (Scotch Extremely Strong 10lb Velcro Strips)
Scotch Heavy Duty Reclosable Fasteners,1 in by 3 in,2 Sets/Pack,6-Packs
These Velcro Pads are reclosable in case you need to remove drive assembly from Sabrent case.
https://www.amazon.com/Scotch-Mount-Double-Extreme-Mounting-Adhesive/dp/B00FUEN2GK/ref=sr_1_1_sspa?crid=12WL51MEJD5T6&dib=eyJ2IjoiMSJ9.wJi30b0AHGY4OTi-IlfTuzTRfAPmiRDpRxiNVwEswFTXGq19gWtLZlg0TiGgsZvMZePETraVJtyjBkascyVAdt33FOYGdaFaArO1siBOgsXB7zRfOARXsJilDQgr4G3zAVVHZEmXsGZBbxojNiwYPR6_xuKLtJblT7WP4UkorKVqU_HQdIQK3Pey20SokRL-8pCljRST-VGfEhCztS1JuSbT7MgQA8Q_X41_IMltN8ahFWWDKGF_whr5HFw6YOZJzxCCC50jB7Am14WlcX1rHCmgBfU4epWHCVwTFmITDDY.KL3nhankcCkwz5omi2RfhanYg_gZWd-v5WL3InuSQ7g&dib_tag=se&keywords=scotch+mount+extreme+double+sided+tape&qid=1708521200&sprefix=scotch+mount+ex,aps,122&sr=8-1-spons&sp_csd=d2lkZ2V0TmFtZT1zcF9hdGY&psc=1
(5) BENFEI 15 Pin SATA Power Y-Splitter Cable 8 Inches - 2 Pack
https://www.amazon.com/dp/B07ML447FG?psc=1&ref=ppx_yo2ov_dt_b_product_details
Nylon Zip ties used for cleaner cable management.
Debian HBA Driver Documentation
Update
After a few days of running this configuration, I noticed that the 9600-24i card runs really hot in my Dell T7920 case with default fan speed, consuming 20W of power compared to the 9500-16i which consumes 8.9W of power. This is evident in the size of the huge 9600-24i heatsink. This 9600 card will likely require supplemental fan to keep card cool. In comparison, the 9500-16i card runs warm in my case without additional cooling.
Also, this card does not "post to bios" or display bios splash screen like the 9500-16i card does. The same is true for the 9600-16i card. Although both the 9600-24i and 9600-16i cards work well with TrueNAS Dragonfish Beta 1 when loaded, I have been unable to boot off drives directly attached to these 9600 series cards. Although not a deal breaker, this is somewhat frustrating given the high price tag of these cards. I believe this was first mentioned in the post below.
https://www.reddit.com/r/DataHoarder/comments/182b0ar
Lastly, the price is somewhat steep given I am getting similar speeds (roughly 2000 mb/s write and 2000 mb/s read with IcyDock MB699VP-B V3) when compared to the 9500-16i card in TrueNAS system running on a PCIe 3.0 Dell T7920 workstation. The advantage of this card is off course the additional slimSAS internal connector (for a total of 3 SlimSAS 8i SFF-8654 connectors) and potentially faster speeds in PCIe 4.0. Because of these reasons, substantially lower price, and more mature TrueNAS/Debian Linux driver, I am continuing my all-flash TrueNAS build based on the 9500-16i card ($300 on Amazon), which is likely the cost effective sweet spot for my all-flash TrueNAS build.
I am currently trying to setup a JBOD-like enclosure to house the remaining (3) 5.25 inch ICY Dock mobile racks, with my Dell Workstation containing a total of (5) 9500-16i Broadcom HBA cards connected to (5) ICY Dock MB699VP-B V3 Mobile Racks via (10) OCuLink cables. I prefer to use these HBA cards rather than a PCIe switch card. Each U.2 drive should receive PCIe 3.0 x 4. So far the system is running well with my current (2) ICY Dock mobile racks, for a total of (8) U.2 drive bays and an additional (3) U.2 drives via Dell's Drive kits as above. Once all (5) HBA cards are in place, I will have the potential to add a total of (20) U.2 drives via the ICY Dock racks and again (3) additional U.2 drives directly connected to the Dell miniSAS ports on the system board. I'll update accordingly.
In addition to the Broadcom HBA cards, I have also connected all available Dell T7920 NVME kits to the motherboard directly. This also allowed me to boot off the motherboard via direct miniSAS connections without taking up a PCIe slot for an additional M.2 drive PCIe adapter card. There are a total of (4) miniSAS connectors on one of the system boards, one of which I use to boot off TrueNAS scale operating system using an M.2 NVME in a Dell M.2 SAS Flex Bay Module and the other three used as U.2 drives in U.2 NVME SSD Hard Drive Expansion Interface Backplane Kit. Again, I have used Dell official kits for these U.2 NVME drives. Surprisingly, I am getting very comparable speeds, i.e., just about 2000mb/s read and 2000mb/s write speeds on AJA benchmark out of the system board direct miniSAS connections using Dell Kits and cables. So at least for my Dell T7920 PCIe 3.0 system, the "direct" motherboard connections are comparable to the Broadcom cards. These speed results remained similar with the Intel D5-P4326 15.36TB and Solidigm D5-P5336 30.72 TB U.2 ssd drives as well as with the Samsung 990 Pro M.2 ssd drive.
Despite the fact that the Broadcom Tri-Mode HBA Storage Adapters are limited by the Tri-Mode architecture which presents NVME devices as SAS/SCSI devices to system with decreased performance due to translated NVME commands, my speed results are very similar to drives connected directly to Dell's system board miniSAS connectors. Although these NVME drives are capable of much greater speeds, these drives overall take a substantial performance hit going though the Broadcom Tri-Mode HBA controller in comparison to direct access systems. Anyways, I am somewhat limited in my options for a TrueNAS compatible HBA card available at a reasonable price.
I realize that you can just buy a dedicated NVME server for TrueNAS from one of the well known server vendors with each drive having direct access to the underlying CPU and hardware. Unfortunately, these ready-to-go off the shelf NVME rack systems are extremely expensive. One exception is a used Gigabyte R282-Z92 PCIe 3.0 server off eBay.
Another option is to use a PCIe x 16 Gen4 MicroSATA Card ReDriver with SlimSAS Ports Add in Card or Supermicro AOC-SLG4-4E4T Retimer cards in a bios supported Supermicro motherboard. I don't have a lot of experience with these cards, some of which may require tweaking with DIP switches. I will try to test some of these options soon.
Lastly, another approach is to use the H13SSL-NT Supermicro PCIe 5.0 Motherboard with Genoa EPYC 9654 processor in a case such as the Thermaltake Core P3 Pro E-ATX Tempered Glass Mid Tower Computer Chassis which can accommodate multiple 5.25" ICY Dock Mobile Racks. "The H13SSL-N/NT has four NVMe ports (two ports per one MCIO connector). These ports provide high-speed, low-latency PCIe 5.0 x4 connections directly from the CPU to NVMe Solid State (SSD) drives. This greatly increases SSD data-throughput performance and significantly reduces PCIe latency by simplifying driver/software requirements resulting from direct PCIe interface from the CPU to the NVMe SSD drives." You would then just need a MCIO to Oculink cable to connect the ICY Dock Mobile Rack or use Supermicro NVME backplane. "The [additional] SATA/NVMe hybrid ports can support up to eight SATA 3.0 or two NVMe storage devices (PCIe 5.0 x4)." This board would therefore allow for a total of (3) MCIO connectors, each providing (2) NVME ports at PCIe 5.0 x 4 bandwidth. Again, this would allow direct NVME connection to the CPU without the need for the Broadcom HBA Tri-Mode card throughput and latency bottlenecks. In the (3) x16 PCIe 5.0 slots, this board can accommodate (3) Supermicro AOC-SLG4-4E4T Retimer cards, which would allow for (12) PCIe 4.0 x 4 NVME drives.
So, in summary, this board can accommodate (26) NVME drives, each with PCIe 4.0 x 4 bandwidth, without use of PCI switch, with the following configuration:
- (3) MCIO on board connectors supplying (6) PCIe 4.0 x 4 NVME drives (if using ICY Dock Mobile Rack PCIe 4.0) via MCIO to Oculink cables
- (3) AOC-SLG4-4E4T PCIe Retimer cards x 16 PCIe 4.0 supplying (12) PCIe 4.0 x 4 NVME drives via SlimSAS to Oculink cables
- (2) Broadcom 9500-16i cards supplying (8) PCIe 4.0 NVME drives via SlimSAS to Oculink cables, with cards installed in remaining (2) x8 PCIe 5.0 slots
As part of this build, the recommended CPU cooler based on multiple posts on Anandtech Genoa builder's thread is the following Coolserver CPU cooler, available on eBay and Amazon. This CPU cooler was tested to be more quiet and provide better cooling performance compared to other SP5 coolers.
 www.coolserver.com.cn
www.coolserver.com.cn
www.coolserver.com.cn
 forums.anandtech.com

Use a current power supply capable of supplying a Genoa platform as at least one failed build was attributed to using an older outdated power supply.
Avoid unnecessary H13SSL-NT Supermicro Motherboard bios/firmware upgrades as they can lead to multiple problems, include PCIe board compatibility problems. At the very least, backup your current bios/firmware before upgrading as Supermicro apparently does not archive old bios versions.
Be sure to buy EPYC retail non-locked CPUs, specifically indicating "unlocked" or "no vendor locked". So many posts regarding being unable to post on new Genoa builds are likely related to locked or defective CPUs.
forums.anandtech.com
Be extra careful buying CPUs from China off eBay. I was however able to return some items back to China for a full refund via eBay given their buyer protection policies. It did however take some time to ship back to China via USPS.
Beware of buying parts off Alibaba as refunds may not be honored as mentioned in post below.
forums.anandtech.com
Be aware that EPYC CPUs from Dell systems with Platform Secure Boot (PSB) enabled become locked to the Dell Platform (See video below). Even though this option is available for "more secure" platform, this practice of leaving this feature enabled without user authorization is totally unacceptable.
My goal was again to try to build this with "spare" parts at a substantially lower total cost, in a system that is relatively quiet. If you know of any other non-proprietary TrueNAS compatible HBA, Retimer, or Redriver cards which would provide greater performance than the bottlenecked Broadcom Tri-Mode HBA card based system at a comparable price, please let me know. Fortunately, we are now entering times where the cost of entry to high capacity U.2/U.3/E1.S NVME drives is becoming more affordable.
Update 2/24/24
So far system has been 100% stable with no problems.
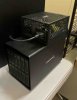
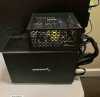
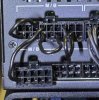
I have done a bit of cable management in the back of the JBOD as seen in the new pictures including addition of custom Seasonic Jumper Connectors to allow power supply to turn on without having to use large power supply motherboard cable and Seasonic jumper connector. I also replaced power cord with right angle variant for cleaner look. The right angled power cord also partially covers the on/off switch thereby preventing accidentally turning off unit if power switch is bumped. I may add a 3-D printed back plate to the JBOD.
Last ICY Dock Mobile Rack finally arrived from Hong Kong, China, which took about 2 weeks to arrive via USPS. System is running flawlessly with all (5) MB699VP-B V3 ICY Dock Mobile Racks.
I elected to put on the ATX fanless power supply for quick setup. This again is not entirely necessary since the Dell workstation can provide the necessary power via SATA power cables attached to the system board. Alternatively, there is enough room in the back of the Sabrent case to add a smaller power supply.
PCI Slot Configuration - using default PCIe Slot BIOS configuration to evenly distribute PCIe lanes to the PCIe slots
PCIe Slots 6 and 7 require a Dual CPU configuration to work
PCIe Slot 7 - Broadcom 9500-16i - ICY Dock Mobile Rack installed in front of Dell case
PCIe Slot 6 - Broadcom 9500-16i - ICY Dock Mobile Rack installed in back of Dell case, below power supply
PCIe Slot 1 - VisionTek Radeon RX550 4GB GDDR5 in small open-ended slot
PCIe Slot 2 - Broadcom 9500-16i - Slot 2,3, and 4 Broadcom HBA cards connected to my JBOD ICY Dock Assembly
PCIe Slot 3 - Broadcom 9500-16i
PCIe Slot 4 - Broadcom 9500-16i
PCIe Slot 5 - Mellanox MCX613106A-VDAT 200GbE Card
Drive Configuration:
(1) M.2 NVME via direct connect to Dell’s system board miniSAS connector via Dell M.2 SAS Flex Bay Module (used as boot drive)
(3) 3.5 inch U.2 NVME via direct connect to Dell’s system board miniSAS connectors via (2) Dell U.2 NVME SSD Hard Drive Expansion Interface Backplane Kits. Each of these Hard Drive Expansion Interface Backplanes contain (2) bays, for a total of (4) bays. The M.2 SAS Flex Bay uses one of these bays, thereby leaving (3) bays left for (3) U.2 drives.
(20) 2.5 inch U.2 NVME SSDs via (5) ICY Dock Mobile Racks
______________________________
Lastly, here is a brief guide on updating Broadcom HBA card firmware using Windows.
______________________________
To Update Windows Broadcom Driver:
Update Broadcom driver using Device Manager -> Storage controllers -> Double click on Broadcom controller -> Driver -> Update Driver
As mentioned above, don't update P411W-32P card's Windows Driver.
_______________________________
Use this Password for opening and moving Broadcom drivers if necessary, copy and paste sentence below.
I have read and understand the attached txt file.
________________________________
Update HBA 9500 series card firmware:
Download BOTH firmware (HBA_9500-16i_Mixed_Profile.bin) and bios (pblp_catalog.signed.rom) off Broadcom website.

 www.broadcom.com
Products -> Storage and Systems -> Host Bus Adapters -> 12Gb/s SAS/NVMe Adapters -> HBA 9500-16i Tri-Mode Storage Adapter -> Downloads -> Firmware
www.broadcom.com
Products -> Storage and Systems -> Host Bus Adapters -> 12Gb/s SAS/NVMe Adapters -> HBA 9500-16i Tri-Mode Storage Adapter -> Downloads -> Firmware
copy/drag and drop firmware, bios, and firmware update utility (storcli64.exe) to c:\ directory
Use Terminal (Admin), right click windows icon, then select Terminal (Admin)
cd \ change to root directory
c:\storcli64.exe show
c:\storcli64.exe show all
If one 9500 series controller is present, the controller is designated c0. Two controllers, c0 and c1.
c:\storcli64.exe /c0 show all
c:\storcli64.exe /c1 show all
c:\storcli64.exe /c0 download file=c:\HBA_9500-16i_Mixed_Profile.bin (updates firmware)
reboot
c:\storcli64.exe /c0 download psoc file=c:\pblp_catalog.signed.rom (updates bios)
reboot
_______________________________
Update HBA 9600 series card firmware:
Download firmware off Broadcom website, Broadcom Inc. | Connecting Everything
copy/drag and drop firmware and firmware update utility (storcli2) to c:\ directory
Use Terminal (Admin), right click windows icon, then select Terminal (Admin)
cd \ change to root directory
c:\storcli2.exe show
c:\storcli2.exe show all
If one 9600 series controller is present, the controller is designated c0. Two controllers, c0 and c1.
c:\storcli2.exe /c0 show all
c:\storcli2.exe /c1 show all
c:\storcli2.exe /c0 download file=c:\9600-24i_full_fw_vsn_pldm_pkg_signed.rom (updates both firmware and bios)
reboot
Release Advisory: Vision Firmware upgrade process
When attempting to download an ROP image to a controller containing a different Vision firmware component than the one currently on the controller, storcli will produce the following error message: "Component Image download failed. Need offline activation to activate the Component Images."
If this occurs, take the following steps to load and activate the firmware.
- Use the 'activationtype' option to storcli, eg. > storcli2 /c0 download file=<ROP image file name> activationtype=offline
- When this command completes successfully, the following message will be displayed: "A Complete Reset is required to activate Component Images."
- The next step is to restart the Host PC. (warm reboot)
- Wait 5 minutes after the OS boots or attempts to boot.
- To activate the new image, a full AC power cycle is now required.
I bought a probable counterfeit? 9600-24i card (~$250) on eBay from China which displayed this error message with storcli2 command above.
The other 9600-24i card bought off Amazon from US distributor did not have this error.
As mentioned above, in this case, enter the following command.
c:\storcli2.exe /c0 download file=c:\9600-24i_full_fw_vsn_pldm_pkg_signed.rom activationtype=offline *****This works!!!*****
c:\storcli2.exe /c0 download file=c:\9600-24i_full_fw_vsn_pldm_pkg_signed.rom activationtype=offline noverchk *****This works for downgrading!!!*****
_______________________________
Update P411W-32P card firmware:
Use the g4Xflash_x64 tool to update the firmware on your adapter. Download the g4Xflash tool from the Broadcom download center under P411W-32P downloads
Copy/Drag and Drop g4Xflash_x64.exe and 4.1.2.1_pci4armfw_hba_signed.fw files to c:\
Use Terminal (Admin), right click windows icon, then select Terminal (Admin)
cd \ change to root directory
Enter
c:\g4Xflash_x64.exe
g4Xflash v4.8.3.0 - Broadcom Inc. (c) 2023 (Bld-43.61.14.72.10.0)
-------------------------------------------------------------------------------
DeviceId/RevId WWID FwVersion PCIAddr Type Mode
1) PEX88048 B0 500605b0:000272b8 01.03.01.00 00:21:00:00 Switch MPI
Enter the target index to connect with :
Enter
1
Following are the list of commands available,
list - Lists all the compatible devices
select - Select a device from the discovered list
help - Lists the available commands
quit - Quits from the application
show - Shows FW/Manufacturing information
reset - Performs various resets
dl - Downloads the Firmware/Flash image
ul - Uploads the Firmware/Flash images
erase - Erases the firmware/flash regions
For example, enter show
PEX88048 B0> show
Product Id : PEX88048 B0
Firmware Version : 01.03.01.00
SAS Address : 500605b0:000272b8
Vendor Id : BROADCOM
Mfg. Product Id : PEX88048
Revision Level : 0013
Mfg. Associated FW Rev : 00:32:00:00
Mfg. Revision : 01:01:01:00
Product Name : PEX88048
Platform Name : P411W-32P HBA
Mfg. Time Stamp : 04/22/21 21:12
Platform Serial : HBA-1234
Temperature *C/*F : 47.7 *C / 116.6 *F
PCI Bus Location : 00:21:00:00
System Time : 02/16/2024 04:34:00
PEX88048 B0>
Use the following command to download the firmware and manufacturing image to the Flash memory on the adapter.
dl -f <firmware file> [-s] [-nv] [-nr] [-wd] [-hr]
dl -f c:\pci4armfw_hba_signed.fw
Where:
-f = Firmware image that needs to be downloaded.
-s = Silent mode. Performs the download operation without confirmation.
-nv = Ignores or skips image and region validation.
To downgrade firmware, enter the following dl command. No need to erase firmware first as you can brick your card.
PEX88048 B0> dl -f c:\4.1.2.1_pci4armfw_hba_signed.fw
Do you want to continue to perform 'Download' (Yes/No) : Yes
- Downloading the image...
- Image has been sent to firmware.
- Post validating image by uploading back.
- Post validation of the image is successful.
Image has been downloaded successfully. Restart the system to make the fresh image active.
_______________________________
Thanks,
Rich
I just successfully added the Broadcom 9600-24i card connected to ICY Dock MB699VP-B V3 Mobile Rack via (2) OCuLink cables on my Dell T7920 TrueNAS system running TrueNAS-SCALE-24.04-BETA.1 (Dragonfish). I am trying to build an All-Flash NVME U.2 TrueNAS system that is quiet, reasonably fast, and “economical”, made mostly of spare parts that I already have. Under this configuration, each drive is getting PCIe 3.0 x 4 NVMe bandwidth, accommodating drives up to 15mm in height. Unfortunately I am limited by PCIe 3.0 speeds as well as the Broadcom card Tri-Mode performance bottleneck on my older Dell T7920 system. I have up to (5) available PCIe 3.0 slots on this Dual CPU system for HBA cards, allowing up to a theoretical maximum of (20) U.2 drives (if using 9500-16i cards), with each drive connected at PCIe 3.0 x 4. These cards do not use a PCIe switch like the P411W-32P cards. Obviously, the additional (3) ICY Dock Mobile Racks would require a separate external 5.25 inch enclosure given the limited space of the Dell T7920 workstation. In my current setup, I have one ICY Dock mobile rack up front in the 5.25 slot and a second mobile rack in back lower part of the case, just below the power supply. Mounting mobile racks in the Dell case required some ingenuity, including 3M red double sided foam sticky tape, heavy duty adhesive velcro strips, and adhesive plastic shims. 3d printing a mounting structure may help in the back of the case. I have updated firmware/bios to current or working versions on all Broadcom cards tested. Use case will be heavy data archiving, benefiting from speed and reliability of NVME drives.
Ideally, I would like to use a direct NVME hardware access server that optimizes the potential of each NVME drive, several of which are likely proprietary in design. The UBM (Universal Backplane Management) implementation by Broadcom is an attempt to standardize NVME backplane architecture. For this build, I of course used the existing backplane in the ICY Dock device which supports Tri-Mode HBA Controllers.
An alternative enclosure includes the Serial Cables enclosures as seen on recent Storage review article and YouTube video, website Serial Cables, SAS Cables, SATA Cables, MiniSAS Cables, IPass Cables, IPass Adapters, MiniSAS Adapters, SAS Adapters, SATA Adapters, Serial Cables, Adapters and Accessories from Serial Cables.
Broadcom MegaRAID 9670W-16i RAID Card Review
NVME U.2 rack systems:
Supermicro SYS-220U-TNR server that Storage Review did a short video on.
Supermicro 2114S-WN24RT
Gigabyte R282-Z94
R282-Z94 (rev. A00) | Rack Servers - GIGABYTE Global
Hardware-level root of trustAMD EPYC™ 7003 Series processorsAMD EPYC™ 7003 Series processors with AMD 3D V-Cache™ TechnologyDual processor, 7nm technology8-...
TYAN Transport HX TN85-B8261 Review
AMD EPYC 9004 Barebones TN85B8261 B8261T85E24HR-2T
AMD EPYC 9004 Barebones TN85B8261 B8261T85E24HR-2T
Lastly, 45 Drives is coming out with an All-Flash Stornado F2 server. They are using the Broadcom 9600-16i card in their current F2 Stornado and offer the server in both Intel and AMD variants. The AMD cpus can offer high count PCIe lanes with just one CPU. Despite the fact that the F2 uses the 9600-16i Broadcom HBA Tri-Mode card, this system may benefit from their dedicated in-house developed UBM backplane. I look forward to seeing how this server performs. Very exciting innovative products coming out of this company, which also develops and produces the high quality cases used in the servers.
45Drives - Big. Strong. Fast. Storage Servers..
It will also be interesting to see some coming reviews of the iX systems upcoming F100 All-Flash Flagship TrueNAS server which runs TrueNAS Scale.
TrueNAS F-Series High-Performance Storage Systems
TrueNAS F-Series is a high-performance NVMe storage solution for maximum speed and data density.
www.truenas.com
Viking Enterprise Solutions VSS2249P storage server
Storage Server VSS2249P - Viking Enterprise Solutions
The VSS2249P storage server from Viking Enterprise Solutions (VES) offers 2U Dual Node, 24 Single Port U.2 PCIe v4 Drives. Learn more.
www.vikingenterprisesolutions.com
QLC SSDs Deliver 175GB/s in 2U Storage Server
QLC SSDs are worth evaluating and can often be faster than TLC competitors, especially when intelligent software is used.
www.storagereview.com
"The Viking Enterprise Solutions (VES) VSS2249P storage Server offers 24, 2.5-inch U.2 (SFF-8639) SSDs utilizing the PCIe Gen 4 NVMe interface combined with two server modules equipped with AMD EPYC Rome CPUs. This is a dual-node system: each server has access to 12 NVMe SSDs via x4 PCIe Gen 4 lanes for optimum performance."
"The Viking Enterprise Solutions VSS2249P is a 2U dual-node storage server featuring 24 bays for single port U.2 PCIe v4 drives. More specifically, each server node (or module) supports 12 single-port, hot-pluggable NVMe 2.5-inch U.2 (SFF-8639) SSDs via x4 PCIe Gen4 lanes, making this a performance-driven server."
"The VSS2249P uses similar nodes on the backend, although 12 SSDs are direct-connected to one node, with the remaining 12 to the other. This gives each SSD a full 4-channels of PCIe Gen4 lanes back to the node it is connected to."
"This isn’t a trivial issue; the single-ported drives will perform best in a solution that can deliver four PCIe v4 lanes from one of the AMD server nodes to each drive. Direct access offers the highest performance from each SSD, as opposed to flowing through an internal expander that can limit bandwidth. Additionally, this system is designed for single-ported SSDs, like Solidigm P5316, compared to the review from the previous Viking Enterprise Server that was designed for dual-ported SSDs."
Viking Enterprise Solutions (VES) VSS2249P architecture block diagram
Now back to the DIY build. Compared to my other rack servers, this setup is relatively “quiet”, currently sitting in my office closet. With the ICY Dock fan speed to low (middle setting), the NVME drives remain relatively cool or slightly warm to the touch. The 9600-24i card however is running really hot in my Dell T7920 case with default fan speeds.
Although the system is running well overall, I am unable to get the 9600-24i to post to BIOS/display BIOS Splash Screen like I am able to do with the 9500-16i cards. Fortunately, this is not necessary with the TrueNAS system. I tried changing the Dell UEFI and Legacy BIOS settings with no luck. Is this typical of the Broadcom 9600 HBA series? Is there a card option I can turn on or off? Is this a built-in security option? The card also works well with Windows 11 Pro. As a result of not posting to bios, I cannot boot off any disks attached to the 9600-24i card. The card otherwise loads well with the included Beta 1 Dragonfish driver.
https://www.reddit.com/r/DataHoarder/comments/182b0ar
Although the 9600-24i card adds an additional SlimSAS connection for a total of 3 ×8i SFF-8654 ports, the peak speeds on this card (roughly 2000MB/sec write and 2000 MB/sec read on single drive in non-redundant stripe mode) are very similar to the 9500-16i card, which has (2) SlimSAS ports. Given the similar speeds (on PCIe 3.0 system at least) and large price differential (9600-24i $936.99 vs 9500-16i $300 on Amazon), it’s probably best to just use the cheaper 9500-16i in your build with multiple HBA cards. I currently do not have a PCIe 4.0 system for testing.
I also have the P411W-32P card ($700+ card on Amazon), which has already been documented on the Level 1 Tech forum to not work with the ICY Mobile Rack using most current Broadcom firmware versions 4.1.3.1 and 1.8.4.0. I had the same experience with the most recent 1.8.4.0 firmware. The card does however work with the ICY Mobile Rack if the card's firmware is rolled back to version P14.2 (Version 4.1.2.1) dated 2/24/2021 as found in Broadcom's firmware archive. I have confirmed this combination works with my setup with firmware version 4.1.2.1.
This was mentioned on Level 1 Tech forums, “the P411W-32P works with the MB699VP-B V3 with all firmwares up to including the package listed as P14.2 on Broadcom’s site.”
A Neverending Story: PCIe 3.0/4.0/5.0 Bifurcation, Adapters, Switches, HBAs, Cables, NVMe Backplanes, Risers & Extensions - The Good, the Bad & the Ugly
I’m sorry to hear that. In this case Icy Dock is full of it, the P411W-32P works with the MB699VP-B V3 with all firmwares up to including the package listed as P14.2 on Broadcom’s site. The reason as we found out in this thread is that in newer firmwares Broadcom killed the P411W-32P’s support...
forum.level1techs.com
Contrary to a post in the Level 1 Tech forum stating that you have to delete the current firmware before you rollback firmware, I was able to just run the g4Xflash_x64 program without first erasing firmware. One user on the forum bricked his card after deleting the card's firmware. I just used the firmware program with the 4.1.2.1 firmware to "overwrite" the newer firmware with the old firmware.
As mentioned in another post, do not flash this card with the firmware provided by ICY Dock as a member of Level 1 Tech forums bricked his card. All acceptable firmware has to be "signed" authentic Broadcom firmware available on their website.
A Neverending Story: PCIe 3.0/4.0/5.0 Bifurcation, Adapters, Switches, HBAs, Cables, NVMe Backplanes, Risers & Extensions - The Good, the Bad & the Ugly
If ICYDock gives you a customized firmware to use with the P411W-32P and they say it’s the only way to use the MB699VP-B V3 … DO NOT USE IT !!! Just don’t. I contacted them regarding compatibility with the MB699VP-B V3 and the P411W-32P they provided me 4.1.5 firmware and claimed that it was...
forum.level1techs.com
Be warned that once you downgrade this card's firmware to 4.1.2.1 on a Windows 11 system and you install the most recent Broadcom Windows drivers, your Windows operating system will crash on boot up with the Blue Screen of Death. To repair your Windows 11 operating system, you then have to physically remove the P411W-32P Broadcom card from the computer and then delete all the Broadcom hidden devices and drivers as mentioned in the post below. Go into Windows Device Manager, show hidden devices and uninstall all Broadcom storage controller entries and be sure to check the option to also delete the driver files.
A Neverending Story: PCIe 3.0/4.0/5.0 Bifurcation, Adapters, Switches, HBAs, Cables, NVMe Backplanes, Risers & Extensions - The Good, the Bad & the Ugly
@Kleog If you’re having constant BSoD issues with the P411W-32P make sure to: Flash the older firmware P14.2, not the current P14.3 (no SSDs show up). Danger: Drivers P23 don’t work (signature issues), drivers P18_0 only work with the non-functional firmware P14.3, using them with the...
forum.level1techs.com
After removing the hidden Broadcom devices and drivers, you then have to delete/move all (3) instances of the ltSas35i.sys driver (see picture below). I just moved my instances of the ltSas35i.sys files to a junk folder on the desktop. I did not touch the ltSas35.sys files. This was successful in restoring Windows 11 back to working state. My advice is to not update any Windows Broadcom drivers for this card. The default automatically loaded Windows driver version 2.61.29.80 dated 7/21/2017 works just fine.
A Neverending Story: PCIe 3.0/4.0/5.0 Bifurcation, Adapters, Switches, HBAs, Cables, NVMe Backplanes, Risers & Extensions - The Good, the Bad & the Ugly
Update: I successfully used P411w-32p on Win11. Install another win10 system to update the firmware to 4.1.2.1 (or downgrade). removed the P411w-32p out of the system. removed all mpi2ses.sys, itsas35.sysh and itsas35i.sys related file names on the win11 system. (Because I was using the...
forum.level1techs.com
A Neverending Story: PCIe 3.0/4.0/5.0 Bifurcation, Adapters, Switches, HBAs, Cables, NVMe Backplanes, Risers & Extensions - The Good, the Bad & the Ugly
Welp! I had played around with the 2023-03 update of Windows 11 22H2 and my P411w-32p. Fresh install, no internet, and at first, all I was getting out of the ordeal were BSODs. A word of caution to anyone who wants to try this in the future… The driver available out of box will cause BSODs...
forum.level1techs.com
The card however works fine with Ubuntu and presumably TrueNAS with the 4.1.2.1 firmware version. I use Windows to update card firmware and check settings on this card. The card is now "locked into" the older 4.1.2.1 firmware version until I hear of any new full functional firmware versions, which is unlikely since Broadcom is trying to force this card to comply with its UBM backplane standard. Very crappy driver support from Broadcom, with Level 1 forum post above clearly showing the pain this card has caused so many users.
By the way, be careful to buy only authentic Broadcom versions of these cards as there are a lot of cheap Chinese counterfeit “Broadcom” cards on Ebay which look almost exactly the same as the authentic card but can have firmware and other hardware limitations. The Art of Server YouTube channel has several videos on this subject.
So far TrueNAS Dragonfish Beta 1 is super stable with no instability or detectable bugs so far.
This statement below from TrueNAS regarding TrueNAS SCALE hints at where future development of this system is going.
“TrueNAS SCALE has inherited the storage functionality and automated testing from CORE. SCALE has matured rapidly and offers a more robust apps environment based on Linux Containers & KVM. TrueNAS SCALE is generally recommended for new users that need embedded apps, and will gradually become the recommended version for all new TrueNAS users.” The upcoming iX Systems flagship All-Flash F100 server will run on TrueNAS Scale.
TrueNAS SCALE Dragonfish Reaches BETA
iX Systems and the Debian Linux development team did a great job with this beta release - super stable and feature rich.
My test system:
Dell 7920 Firmware 2.38.0 (Current)
Dual CPU Intel Xeon Gold 6258R @ 2.70GHz (2nd CPU adds 2 additional PCIe 3.0 x 16 slots), bought on eBay.
512 MB Ram - NEMIX RAM 512GB (8X64GB) DDR4-3200 PC4-25600 ECC RDIMM Registered Server Memory Upgrade for Dell PowerEdge T550 Tower
(1) Mellanox MCX613106A-VDAT 200GbE Card, plugged into PCI slot #5, connected at 100GbE to an Arista 100 GbE Switch
(5) Broadcom 9500-16i, slots #2, #3, #4, #6, and #7 (when completely setup), bought on Amazon.
(4) DiliVing SlimSAS 8X to 2*oCulink 4X,SFF-8654 74pin to 2*SFF-8611 36pin Cable 80cm(Broadcom MPN 05-60001-00), bought on Amazon
(2) ICY DOCK 4 x 2.5 NVMe U.2/U.3 SSD PCIe 4.0 Mobile Rack for 5.25" Bay with OCuLink | ToughArmor MB699VP-B V3, bought on eBay, shipped from Hong Kong, China. Be sure to get this particular V3 model which supports Tri-Mode Controllers and accommodates 15mm U.2 drives.

New ICY Dock MB699VP-B V3 4x 2.5" NVMe U.3 SSD PCIe 4.0 Mobile Rack with OCuLink | eBay
<li> New ICY Dock MB699VP-B V3 4x 2.5" NVMe U.3 SSD PCIe 4.0 Mobile Rack with OCuLink</li> <li> Features:</li>.
www.ebay.com
ICY DOCK M.2 PCIe 3.0/4.0 NVMe SSD to 2.5" U.2 SSD Converter / Mounting Adapter with Heatsink | EZConvert MB705M2P-B
(2) U.2 NVME SSD Hard Drive Expansion Interface Backplane Kit Compatible with Dell Precision 7920 T7920 Tower Workstation 076W3N
(1)M.2 SAS Flex Bay Module Compatible with Dell Precision T5820 T5820XL T7820 T7820XL T7920 T7920XL 066XHV 66XHV w/Tray Without SSD only for M Key 2280 M.2 NVMe (PCIe Gen3 x4) SSD
(1) SAMSUNG 980 PRO SSD 2TB PCIe NVMe Gen 4 Gaming M.2 Internal Solid State Drive Memory Card MZ-V8P2T0B/AM (TrueNAS is installed on this M.2 drive.)
(4) Intel D5-P4326 Series 15.36TB U.2 NVMe/PCIe 2.5" QLC SSD Solid State Drive, bought on eBay, $850/per drive new. I will add more drives as budget allows.
(2) SOLIDIGM D5-P5336 30.72 TB Solid State Drive - 2.5" Internal - U.2 (PCI Express NVMe 4.0 x4) - Server Device Supported - 0.56 DWPD - 3000 MB/s Maximum Read Transfer Rate, bought on Tech America, $2506/per drive new. I will add more drives as budget allows.
Video Card VisionTek Radeon RX550 4GB GDDR5 (Plugged in the small PCIE Gen 3 x8 open ended slot #1 as I only need minimal video ability to view TrueNAS startup text and IP address.
As mentioned above, this Dual CPU system setup allows for a maximum of (5) Broadcom HBA cards.
Benchmark Testing:
AJA System Test Lite, run off 2019 Mac Pro, connected at 100 GbE via Atto FastFrame 3 N312 Ethernet Card.
Additional items used in this build include the following:
SABRENT USB 3.2 5 Bay 3.5" SATA Hard Drive Tray Less Docking Station (DS-SC5B)
High quality 4mm thick Aluminum housing, very well made
https://www.amazon.com/gp/product/B07Y4F5SCK/ref=ppx_yo_dt_b_search_asin_title?ie=UTF8&th=1
Seasonic PRIME-FANLESS-TX-700
You can also use a smaller power supply in the back of the Sabrent case for a cleaner look.
Not entirely necessary as the Dell T7920 could provide adequate power with the appropriate sata power cables
https://seasonic.com/prime-fanless-tx
https://www.amazon.com/dp/B087Z71TB...0QRP2N2R&psc=1&ref_=list_c_wl_lv_ov_lig_dp_it
(1) YEZriler 10 Pin ATX EPS PSU Jumper Bridge Tool Test Starter for Seasonic Modular PSUs
https://www.amazon.com/dp/B0B2HYZN3C?ref=ppx_yo2ov_dt_b_product_details&th=1
(3-Pack) YEZriler 18 Pin ATX EPS PSU Jumper Bridge Tool Test Starter for Some Specific Types of Corsair Modular PSUs with 18 Pin + 10 Pin Ports
A total of (4) jumpers across these 2 connectors allows you to jumper the power supply directly instead of using a large assembly of Seasonic jumper plug at the end of the supplied motherboard cable for a cleaner look. I used a multimeter continuity tester to "replicate" jumper settings from the supplied motherboard cable with Seasonic jumper in place. Obviously double check your jumper placement with continuity tester as this may vary between ATX power supplies.
JRready ST5255-05 Pin Extractor Tool Kit, Terminal Removal Tool with 5PCS Replacement Tips, for Molex Mini-Fit Jr., Micro-Fit 3.0,3P/4P PC Fan, AMP Micro Mate-N-Lok Series Connectors
https://www.amazon.com/dp/B0CHYM3YQV?psc=1&ref=ppx_yo2ov_dt_b_product_details
You will need this Pin Extractor Tool Kit to remove and reposition pins in above ATX connectors.
(10) DiliVing SlimSAS 8X to 2*oCulink 4X,SFF-8654 74pin to 2*SFF-8611 36pin Cable 80cm(Broadcom MPN 05-60001-00)
https://www.amazon.com/dp/B0B8N9N8HC?psc=1&ref=ppx_yo2ov_dt_b_product_details
Scotch-Mount Double Sided Mounting Tape Heavy Duty, Black Extreme Mounting Tape
I used this tape to mount the (3) ICY Dock Mobile Racks together as well as mount the power supply to the Sabrent Housing.
You can then mount this ICY Dock Assembly to the Sabrent Housing via Heavy Duty Velcro Pads from Lowes (Scotch Extremely Strong 10lb Velcro Strips)
Scotch Heavy Duty Reclosable Fasteners,1 in by 3 in,2 Sets/Pack,6-Packs
These Velcro Pads are reclosable in case you need to remove drive assembly from Sabrent case.
https://www.amazon.com/Scotch-Mount-Double-Extreme-Mounting-Adhesive/dp/B00FUEN2GK/ref=sr_1_1_sspa?crid=12WL51MEJD5T6&dib=eyJ2IjoiMSJ9.wJi30b0AHGY4OTi-IlfTuzTRfAPmiRDpRxiNVwEswFTXGq19gWtLZlg0TiGgsZvMZePETraVJtyjBkascyVAdt33FOYGdaFaArO1siBOgsXB7zRfOARXsJilDQgr4G3zAVVHZEmXsGZBbxojNiwYPR6_xuKLtJblT7WP4UkorKVqU_HQdIQK3Pey20SokRL-8pCljRST-VGfEhCztS1JuSbT7MgQA8Q_X41_IMltN8ahFWWDKGF_whr5HFw6YOZJzxCCC50jB7Am14WlcX1rHCmgBfU4epWHCVwTFmITDDY.KL3nhankcCkwz5omi2RfhanYg_gZWd-v5WL3InuSQ7g&dib_tag=se&keywords=scotch+mount+extreme+double+sided+tape&qid=1708521200&sprefix=scotch+mount+ex,aps,122&sr=8-1-spons&sp_csd=d2lkZ2V0TmFtZT1zcF9hdGY&psc=1
(5) BENFEI 15 Pin SATA Power Y-Splitter Cable 8 Inches - 2 Pack
https://www.amazon.com/dp/B07ML447FG?psc=1&ref=ppx_yo2ov_dt_b_product_details
Nylon Zip ties used for cleaner cable management.
Debian HBA Driver Documentation
Update
After a few days of running this configuration, I noticed that the 9600-24i card runs really hot in my Dell T7920 case with default fan speed, consuming 20W of power compared to the 9500-16i which consumes 8.9W of power. This is evident in the size of the huge 9600-24i heatsink. This 9600 card will likely require supplemental fan to keep card cool. In comparison, the 9500-16i card runs warm in my case without additional cooling.
Also, this card does not "post to bios" or display bios splash screen like the 9500-16i card does. The same is true for the 9600-16i card. Although both the 9600-24i and 9600-16i cards work well with TrueNAS Dragonfish Beta 1 when loaded, I have been unable to boot off drives directly attached to these 9600 series cards. Although not a deal breaker, this is somewhat frustrating given the high price tag of these cards. I believe this was first mentioned in the post below.
https://www.reddit.com/r/DataHoarder/comments/182b0ar
Lastly, the price is somewhat steep given I am getting similar speeds (roughly 2000 mb/s write and 2000 mb/s read with IcyDock MB699VP-B V3) when compared to the 9500-16i card in TrueNAS system running on a PCIe 3.0 Dell T7920 workstation. The advantage of this card is off course the additional slimSAS internal connector (for a total of 3 SlimSAS 8i SFF-8654 connectors) and potentially faster speeds in PCIe 4.0. Because of these reasons, substantially lower price, and more mature TrueNAS/Debian Linux driver, I am continuing my all-flash TrueNAS build based on the 9500-16i card ($300 on Amazon), which is likely the cost effective sweet spot for my all-flash TrueNAS build.
I am currently trying to setup a JBOD-like enclosure to house the remaining (3) 5.25 inch ICY Dock mobile racks, with my Dell Workstation containing a total of (5) 9500-16i Broadcom HBA cards connected to (5) ICY Dock MB699VP-B V3 Mobile Racks via (10) OCuLink cables. I prefer to use these HBA cards rather than a PCIe switch card. Each U.2 drive should receive PCIe 3.0 x 4. So far the system is running well with my current (2) ICY Dock mobile racks, for a total of (8) U.2 drive bays and an additional (3) U.2 drives via Dell's Drive kits as above. Once all (5) HBA cards are in place, I will have the potential to add a total of (20) U.2 drives via the ICY Dock racks and again (3) additional U.2 drives directly connected to the Dell miniSAS ports on the system board. I'll update accordingly.
In addition to the Broadcom HBA cards, I have also connected all available Dell T7920 NVME kits to the motherboard directly. This also allowed me to boot off the motherboard via direct miniSAS connections without taking up a PCIe slot for an additional M.2 drive PCIe adapter card. There are a total of (4) miniSAS connectors on one of the system boards, one of which I use to boot off TrueNAS scale operating system using an M.2 NVME in a Dell M.2 SAS Flex Bay Module and the other three used as U.2 drives in U.2 NVME SSD Hard Drive Expansion Interface Backplane Kit. Again, I have used Dell official kits for these U.2 NVME drives. Surprisingly, I am getting very comparable speeds, i.e., just about 2000mb/s read and 2000mb/s write speeds on AJA benchmark out of the system board direct miniSAS connections using Dell Kits and cables. So at least for my Dell T7920 PCIe 3.0 system, the "direct" motherboard connections are comparable to the Broadcom cards. These speed results remained similar with the Intel D5-P4326 15.36TB and Solidigm D5-P5336 30.72 TB U.2 ssd drives as well as with the Samsung 990 Pro M.2 ssd drive.
Despite the fact that the Broadcom Tri-Mode HBA Storage Adapters are limited by the Tri-Mode architecture which presents NVME devices as SAS/SCSI devices to system with decreased performance due to translated NVME commands, my speed results are very similar to drives connected directly to Dell's system board miniSAS connectors. Although these NVME drives are capable of much greater speeds, these drives overall take a substantial performance hit going though the Broadcom Tri-Mode HBA controller in comparison to direct access systems. Anyways, I am somewhat limited in my options for a TrueNAS compatible HBA card available at a reasonable price.
I realize that you can just buy a dedicated NVME server for TrueNAS from one of the well known server vendors with each drive having direct access to the underlying CPU and hardware. Unfortunately, these ready-to-go off the shelf NVME rack systems are extremely expensive. One exception is a used Gigabyte R282-Z92 PCIe 3.0 server off eBay.
Another option is to use a PCIe x 16 Gen4 MicroSATA Card ReDriver with SlimSAS Ports Add in Card or Supermicro AOC-SLG4-4E4T Retimer cards in a bios supported Supermicro motherboard. I don't have a lot of experience with these cards, some of which may require tweaking with DIP switches. I will try to test some of these options soon.
Lastly, another approach is to use the H13SSL-NT Supermicro PCIe 5.0 Motherboard with Genoa EPYC 9654 processor in a case such as the Thermaltake Core P3 Pro E-ATX Tempered Glass Mid Tower Computer Chassis which can accommodate multiple 5.25" ICY Dock Mobile Racks. "The H13SSL-N/NT has four NVMe ports (two ports per one MCIO connector). These ports provide high-speed, low-latency PCIe 5.0 x4 connections directly from the CPU to NVMe Solid State (SSD) drives. This greatly increases SSD data-throughput performance and significantly reduces PCIe latency by simplifying driver/software requirements resulting from direct PCIe interface from the CPU to the NVMe SSD drives." You would then just need a MCIO to Oculink cable to connect the ICY Dock Mobile Rack or use Supermicro NVME backplane. "The [additional] SATA/NVMe hybrid ports can support up to eight SATA 3.0 or two NVMe storage devices (PCIe 5.0 x4)." This board would therefore allow for a total of (3) MCIO connectors, each providing (2) NVME ports at PCIe 5.0 x 4 bandwidth. Again, this would allow direct NVME connection to the CPU without the need for the Broadcom HBA Tri-Mode card throughput and latency bottlenecks. In the (3) x16 PCIe 5.0 slots, this board can accommodate (3) Supermicro AOC-SLG4-4E4T Retimer cards, which would allow for (12) PCIe 4.0 x 4 NVME drives.
So, in summary, this board can accommodate (26) NVME drives, each with PCIe 4.0 x 4 bandwidth, without use of PCI switch, with the following configuration:
- (3) MCIO on board connectors supplying (6) PCIe 4.0 x 4 NVME drives (if using ICY Dock Mobile Rack PCIe 4.0) via MCIO to Oculink cables
- (3) AOC-SLG4-4E4T PCIe Retimer cards x 16 PCIe 4.0 supplying (12) PCIe 4.0 x 4 NVME drives via SlimSAS to Oculink cables
- (2) Broadcom 9500-16i cards supplying (8) PCIe 4.0 NVME drives via SlimSAS to Oculink cables, with cards installed in remaining (2) x8 PCIe 5.0 slots
As part of this build, the recommended CPU cooler based on multiple posts on Anandtech Genoa builder's thread is the following Coolserver CPU cooler, available on eBay and Amazon. This CPU cooler was tested to be more quiet and provide better cooling performance compared to other SP5 coolers.
AMD SP5 M98 AMD SP5 系列 AMD CPU系列 产品中心 金钱豹散热器_CPU散热器_服务器散热器_东莞散热器厂家-东莞市掬运五金科技有限公司
AMD SP5 系列 AMD CPU系列 产品中心 金钱豹散热器_CPU散热器_服务器散热器_东莞散热器厂家-东莞市掬运五金科技有限公司
Page 9 - Question - Genoa builders thread.
Page 9 - Seeking answers? Join the AnandTech community: where nearly half-a-million members share solutions and discuss the latest tech.
forums.anandtech.com
4U CPU Cooler Fan 420W Support AMD EPYC SP5 Genoa 9654/9754 CPU Or More | eBay
4U CPU Cooler Fan Support AMD EPYC SP5 Genoa 9654/9754 450W Supermirco H13SSL-N. Power consumption: 420W. Product model: AMD SP5 4U-M98. CPU type: AMD SP5. Bearing type: double ball bearing. Fan speed: PWM 1000-2200RPM.
www.ebay.com
Use a current power supply capable of supplying a Genoa platform as at least one failed build was attributed to using an older outdated power supply.
Avoid unnecessary H13SSL-NT Supermicro Motherboard bios/firmware upgrades as they can lead to multiple problems, include PCIe board compatibility problems. At the very least, backup your current bios/firmware before upgrading as Supermicro apparently does not archive old bios versions.
Be sure to buy EPYC retail non-locked CPUs, specifically indicating "unlocked" or "no vendor locked". So many posts regarding being unable to post on new Genoa builds are likely related to locked or defective CPUs.
Page 2 - Question - Genoa builders thread.
Page 2 - Seeking answers? Join the AnandTech community: where nearly half-a-million members share solutions and discuss the latest tech.
forums.anandtech.com
Be extra careful buying CPUs from China off eBay. I was however able to return some items back to China for a full refund via eBay given their buyer protection policies. It did however take some time to ship back to China via USPS.
Beware of buying parts off Alibaba as refunds may not be honored as mentioned in post below.
Page 3 - Question - Genoa builders thread.
Page 3 - Seeking answers? Join the AnandTech community: where nearly half-a-million members share solutions and discuss the latest tech.
forums.anandtech.com
Be aware that EPYC CPUs from Dell systems with Platform Secure Boot (PSB) enabled become locked to the Dell Platform (See video below). Even though this option is available for "more secure" platform, this practice of leaving this feature enabled without user authorization is totally unacceptable.
My goal was again to try to build this with "spare" parts at a substantially lower total cost, in a system that is relatively quiet. If you know of any other non-proprietary TrueNAS compatible HBA, Retimer, or Redriver cards which would provide greater performance than the bottlenecked Broadcom Tri-Mode HBA card based system at a comparable price, please let me know. Fortunately, we are now entering times where the cost of entry to high capacity U.2/U.3/E1.S NVME drives is becoming more affordable.
Update 2/24/24
So far system has been 100% stable with no problems.
I have done a bit of cable management in the back of the JBOD as seen in the new pictures including addition of custom Seasonic Jumper Connectors to allow power supply to turn on without having to use large power supply motherboard cable and Seasonic jumper connector. I also replaced power cord with right angle variant for cleaner look. The right angled power cord also partially covers the on/off switch thereby preventing accidentally turning off unit if power switch is bumped. I may add a 3-D printed back plate to the JBOD.
Last ICY Dock Mobile Rack finally arrived from Hong Kong, China, which took about 2 weeks to arrive via USPS. System is running flawlessly with all (5) MB699VP-B V3 ICY Dock Mobile Racks.
I elected to put on the ATX fanless power supply for quick setup. This again is not entirely necessary since the Dell workstation can provide the necessary power via SATA power cables attached to the system board. Alternatively, there is enough room in the back of the Sabrent case to add a smaller power supply.
PCI Slot Configuration - using default PCIe Slot BIOS configuration to evenly distribute PCIe lanes to the PCIe slots
PCIe Slots 6 and 7 require a Dual CPU configuration to work
PCIe Slot 7 - Broadcom 9500-16i - ICY Dock Mobile Rack installed in front of Dell case
PCIe Slot 6 - Broadcom 9500-16i - ICY Dock Mobile Rack installed in back of Dell case, below power supply
PCIe Slot 1 - VisionTek Radeon RX550 4GB GDDR5 in small open-ended slot
PCIe Slot 2 - Broadcom 9500-16i - Slot 2,3, and 4 Broadcom HBA cards connected to my JBOD ICY Dock Assembly
PCIe Slot 3 - Broadcom 9500-16i
PCIe Slot 4 - Broadcom 9500-16i
PCIe Slot 5 - Mellanox MCX613106A-VDAT 200GbE Card
Drive Configuration:
(1) M.2 NVME via direct connect to Dell’s system board miniSAS connector via Dell M.2 SAS Flex Bay Module (used as boot drive)
(3) 3.5 inch U.2 NVME via direct connect to Dell’s system board miniSAS connectors via (2) Dell U.2 NVME SSD Hard Drive Expansion Interface Backplane Kits. Each of these Hard Drive Expansion Interface Backplanes contain (2) bays, for a total of (4) bays. The M.2 SAS Flex Bay uses one of these bays, thereby leaving (3) bays left for (3) U.2 drives.
(20) 2.5 inch U.2 NVME SSDs via (5) ICY Dock Mobile Racks
______________________________
Lastly, here is a brief guide on updating Broadcom HBA card firmware using Windows.
______________________________
To Update Windows Broadcom Driver:
Update Broadcom driver using Device Manager -> Storage controllers -> Double click on Broadcom controller -> Driver -> Update Driver
As mentioned above, don't update P411W-32P card's Windows Driver.
_______________________________
Use this Password for opening and moving Broadcom drivers if necessary, copy and paste sentence below.
I have read and understand the attached txt file.
________________________________
Update HBA 9500 series card firmware:
Download BOTH firmware (HBA_9500-16i_Mixed_Profile.bin) and bios (pblp_catalog.signed.rom) off Broadcom website.
Broadcom Inc. | Connecting Everything
Broadcom Inc. is a global technology leader that designs, develops and supplies a broad range of semiconductor, enterprise software and security solutions.
www.broadcom.com
copy/drag and drop firmware, bios, and firmware update utility (storcli64.exe) to c:\ directory
Use Terminal (Admin), right click windows icon, then select Terminal (Admin)
cd \ change to root directory
c:\storcli64.exe show
c:\storcli64.exe show all
If one 9500 series controller is present, the controller is designated c0. Two controllers, c0 and c1.
c:\storcli64.exe /c0 show all
c:\storcli64.exe /c1 show all
c:\storcli64.exe /c0 download file=c:\HBA_9500-16i_Mixed_Profile.bin (updates firmware)
reboot
c:\storcli64.exe /c0 download psoc file=c:\pblp_catalog.signed.rom (updates bios)
reboot
_______________________________
Update HBA 9600 series card firmware:
Download firmware off Broadcom website, Broadcom Inc. | Connecting Everything
copy/drag and drop firmware and firmware update utility (storcli2) to c:\ directory
Use Terminal (Admin), right click windows icon, then select Terminal (Admin)
cd \ change to root directory
c:\storcli2.exe show
c:\storcli2.exe show all
If one 9600 series controller is present, the controller is designated c0. Two controllers, c0 and c1.
c:\storcli2.exe /c0 show all
c:\storcli2.exe /c1 show all
c:\storcli2.exe /c0 download file=c:\9600-24i_full_fw_vsn_pldm_pkg_signed.rom (updates both firmware and bios)
reboot
Release Advisory: Vision Firmware upgrade process
When attempting to download an ROP image to a controller containing a different Vision firmware component than the one currently on the controller, storcli will produce the following error message: "Component Image download failed. Need offline activation to activate the Component Images."
If this occurs, take the following steps to load and activate the firmware.
- Use the 'activationtype' option to storcli, eg. > storcli2 /c0 download file=<ROP image file name> activationtype=offline
- When this command completes successfully, the following message will be displayed: "A Complete Reset is required to activate Component Images."
- The next step is to restart the Host PC. (warm reboot)
- Wait 5 minutes after the OS boots or attempts to boot.
- To activate the new image, a full AC power cycle is now required.
I bought a probable counterfeit? 9600-24i card (~$250) on eBay from China which displayed this error message with storcli2 command above.
The other 9600-24i card bought off Amazon from US distributor did not have this error.
As mentioned above, in this case, enter the following command.
c:\storcli2.exe /c0 download file=c:\9600-24i_full_fw_vsn_pldm_pkg_signed.rom activationtype=offline *****This works!!!*****
c:\storcli2.exe /c0 download file=c:\9600-24i_full_fw_vsn_pldm_pkg_signed.rom activationtype=offline noverchk *****This works for downgrading!!!*****
_______________________________
Update P411W-32P card firmware:
Use the g4Xflash_x64 tool to update the firmware on your adapter. Download the g4Xflash tool from the Broadcom download center under P411W-32P downloads
Copy/Drag and Drop g4Xflash_x64.exe and 4.1.2.1_pci4armfw_hba_signed.fw files to c:\
Use Terminal (Admin), right click windows icon, then select Terminal (Admin)
cd \ change to root directory
Enter
c:\g4Xflash_x64.exe
g4Xflash v4.8.3.0 - Broadcom Inc. (c) 2023 (Bld-43.61.14.72.10.0)
-------------------------------------------------------------------------------
DeviceId/RevId WWID FwVersion PCIAddr Type Mode
1) PEX88048 B0 500605b0:000272b8 01.03.01.00 00:21:00:00 Switch MPI
Enter the target index to connect with :
Enter
1
Following are the list of commands available,
list - Lists all the compatible devices
select - Select a device from the discovered list
help - Lists the available commands
quit - Quits from the application
show - Shows FW/Manufacturing information
reset - Performs various resets
dl - Downloads the Firmware/Flash image
ul - Uploads the Firmware/Flash images
erase - Erases the firmware/flash regions
For example, enter show
PEX88048 B0> show
Product Id : PEX88048 B0
Firmware Version : 01.03.01.00
SAS Address : 500605b0:000272b8
Vendor Id : BROADCOM
Mfg. Product Id : PEX88048
Revision Level : 0013
Mfg. Associated FW Rev : 00:32:00:00
Mfg. Revision : 01:01:01:00
Product Name : PEX88048
Platform Name : P411W-32P HBA
Mfg. Time Stamp : 04/22/21 21:12
Platform Serial : HBA-1234
Temperature *C/*F : 47.7 *C / 116.6 *F
PCI Bus Location : 00:21:00:00
System Time : 02/16/2024 04:34:00
PEX88048 B0>
Use the following command to download the firmware and manufacturing image to the Flash memory on the adapter.
dl -f <firmware file> [-s] [-nv] [-nr] [-wd] [-hr]
dl -f c:\pci4armfw_hba_signed.fw
Where:
-f = Firmware image that needs to be downloaded.
-s = Silent mode. Performs the download operation without confirmation.
-nv = Ignores or skips image and region validation.
To downgrade firmware, enter the following dl command. No need to erase firmware first as you can brick your card.
PEX88048 B0> dl -f c:\4.1.2.1_pci4armfw_hba_signed.fw
Do you want to continue to perform 'Download' (Yes/No) : Yes
- Downloading the image...
- Image has been sent to firmware.
- Post validating image by uploading back.
- Post validation of the image is successful.
Image has been downloaded successfully. Restart the system to make the fresh image active.
_______________________________
Thanks,
Rich
Attachments
-
 708.1 KB Views: 29
 -
 62 KB Views: 30
 -
 65.2 KB Views: 28
 -
 82.9 KB Views: 29
 -
 149.7 KB Views: 18
 -
 47.6 KB Views: 17
 -
 120.2 KB Views: 15
 -
 34.2 KB Views: 10
Last edited:
