Yes, that's supposed to be removed with a screwdriver if you need to pass any cable outside.Does that black panel bit come off and how did you get it off?
Topton Jasper Lake Quad i225V Mini PC Report
- Thread starter ReturnedSword
- Start date
Notice: Page may contain affiliate links for which we may earn a small commission through services like Amazon Affiliates or Skimlinks.
oh yeah, I looked at that and at first it seemed like i'da have to remove it to fit a 2.5" SSD in there (but I didn't, I just had to rotate the 2.5 drive to other side). A label on a CWWK page says it's a punchout if you have to run power in or our (like for a fan).View attachment 27537
Does that black panel bit come off and how did you get it off?
I was going to take a flat head screwdriver and hammer to it, feels like its welded on before I damage it.
I think it's just two thin tabs holding it in so you would just push it and wiggle it back and forth?
Oh interesting! This is the third version of the back cover that I have seen. How long ago did you buy?Does that black panel bit come off and how did you get it off?
I was going to take a flat head screwdriver and hammer to it, feels like its welded on before I damage it.
I have two back covers -
1. Holes for fan 80x80, without wall mounting.
2. Holes for a 40x40 fan and wall mounting. From it, using a drill, I made a variant of the back cover like yours)
This little thing иreaks off easily - I broke off while punching a hole from a slight blow.
Last edited:
Yes its 2 tiny tabs holding it, I did try to use a screw driver and push it down with plenty force but it looked good and proper welded on there so just wrapped the back cover in some microfibre soft cloth and small hammer to it few times and it came undone.oh yeah, I looked at that and at first it seemed like i'da have to remove it to fit a 2.5" SSD in there (but I didn't, I just had to rotate the 2.5 drive to other side). A label on a CWWK page says it's a punchout if you have to run power in or our (like for a fan).
I think it's just two thin tabs holding it in so you would just push it and wiggle it back and forth?
Could have been nice if they just did a screw design with a screw just holding it in place.
Just got it 2 weeks ago or so, dated 1/2023 so built last month with CWWK 6nic i226 version.Oh interesting! This is the third version of the back cover that I have seen. How long ago did you buy?
I have two back covers -
1. Holes for fan 80x80, without wall mounting.
2. Holes for a 40x40 fan and wall mounting. From it, using a drill, I made a variant of the back cover like yours)
This little thing иreaks off easily - I broke off while punching a hole from a slight blow.
Mine was pretty tough almost melted and soldered fully around so even pushing down with a flat head was difficult, but a hammer did the trick
")
That is some good modding, cwwk did chuck in a LEJOWE I think its 70mm fan which was already screwed inside but I have sensitive ears so can hear the coil whine coming from the fan so its gotta go. I don't mind strapping an 120mm fan to it or trying to drill some holes but does not appear they added any 120mm mount fan holes although they do almost line up with the included feet bits so one could try drilling them out if not laying it flat.
Last edited:
I'll take a picture tomorrow of how I did it.I did try to add my Noctua 120mm PWM fan with 4pin but the bios has no fan control settings
Will need to get an Noctua 120mm 3pin 6.8db redux fan it looks!
While I will write in detail.
I want to say right away - I don't give a damn about power consumption, but not about noise.
I installed a 140x140x25PWM fan on top, and an 80x80x25PWM fan on the bottom (I wrote about modifying the cover earlier). Since the complete 80x80x10 fan was noisy, shaking and rattling, it had to be thrown out. And with him, the lid did not close with copper radiators installed on the M2 SSD. I raised the new fan 80x80x25PWM by 5 mm. above the plane of the back cover using brass racks to provide it with at least some possibility of air intake. Instead of regular screws, I picked up 4 stainless steel racks 25mm. with M3 thread mom-dad. And already on them I fixed the back cover with the installed fan. It turned out to provide an internal distance between the M2 SSD and the fan of about 2 mm. I also replaced the thermal paste (in my opinion - disgusting) with the MX-4, which is popular in our area. Replaced the thermal pad. As a result, even during stress testing, the processor temperature never exceeds 61C, and at rest - 29-31C. Fans speeds are kept around 600RPM.
And don't use a 3pin fan. Use 4pin, BIOS controls the speed, I checked. Also, might be useful - the motherboard has two connectors for PWM fans, the second one is on the back side.
Which bios name did you find the speed fan control, not seeing it under my cwwk bios but it is a bit of a mine field with it being unlocked. I see the pc health section with the fan speed but no way to adjust fans.I'll take a picture tomorrow of how I did it.
While I will write in detail.
I want to say right away - I don't give a damn about power consumption, but not about noise.
I installed a 140x140x25PWM fan on top, and an 80x80x25PWM fan on the bottom (I wrote about modifying the cover earlier). Since the complete 80x80x10 fan was noisy, shaking and rattling, it had to be thrown out. And with him, the lid did not close with copper radiators installed on the M2 SSD. I raised the new fan 80x80x25PWM by 5 mm. above the plane of the back cover using brass racks to provide it with at least some possibility of air intake. Instead of regular screws, I picked up 4 stainless steel racks 25mm. with M3 thread mom-dad. And already on them I fixed the back cover with the installed fan. It turned out to provide an internal distance between the M2 SSD and the fan of about 2 mm. I also replaced the thermal paste (in my opinion - disgusting) with the MX-4, which is popular in our area. Replaced the thermal pad. As a result, even during stress testing, the processor temperature never exceeds 61C, and at rest - 29-31C. Fans speeds are kept around 600RPM.
And don't use a 3pin fan. Use 4pin, BIOS controls the speed, I checked. Also, might be useful - the motherboard has two connectors for PWM fans, the second one is on the back side.
It is a punch-out relief. If you press on it on the opposite sides of the two hinges and press down lightly, you should see that it is only holding on by the two hinge points. Simply bend it back and forth and it will break loose.View attachment 27537
Does that black panel bit come off and how did you get it off?
I was going to take a flat head screwdriver and hammer to it, feels like its welded on before I damage it.
BobS
Same here, the bios of a N6005 with 6xi226 hasn't got any Smart Fan section. Tried to complain with CWWK, they couldn't give a flyin' f**k.Which bios name did you find the speed fan control, not seeing it under my cwwk bios but it is a bit of a mine field with it being unlocked. I see the pc health section with the fan speed but no way to adjust fans.
Ali delivered....
I have ordered a 35W USB tester: https://www.aliexpress.com/item/32677950277.html and some of those PD 12V USB chips (to force an USB power supply to deliver 12V), combined this with a Voltcraft 3000 Wattmeter plugged into the wall and compared the consumption of three power supplies at different demands. I chose 1-10W in 1W steps plus some more as output on the USB tester and then checked what the Voltcraft was showing.
Results of a Leicke 75W regular power supply vs. a Ulefone 66W DP adapter (came with the phone) vs a Ugreen 65W GaN charger "up to 95% efficiency".

Up to 10W all of them behave the same way and offer low efficiency. So if you can: attach more than one 12V device to the same power supply to get above 10W total consumption if you want to save energy.
Around 10W the PD power supplies get ahead a bit of the Leicke, which might be caused by the reason the Leicke only has around 85% max efficiency while the others level out at around 87%. At 25W (cost in Europe around 50 Euro/year) we are talking about less than 1W (1 Euro/year cost difference).
I would go down the 12V PD charger route if I have trouble buying regular 12V power supplies or if I just need another one, but exchanging one against another isn't worth the money.
I have another 12V supply (Meanwell) I wasn't able to test because it is running 24/7 (NAS and firewall), but I doubt there will be a big difference. I also had no time yet and need to see if I have enough parts to check what happens if I run a device on 12V and a second one on 5V (Ugreen has 2x USB C and 1x USB A) vs. attaching these devices to separate adapters.
Guess I also will spend some time comparing 5V USB adapters as a part of my equipment, including the switch, runs at 5V.
I have ordered a 35W USB tester: https://www.aliexpress.com/item/32677950277.html and some of those PD 12V USB chips (to force an USB power supply to deliver 12V), combined this with a Voltcraft 3000 Wattmeter plugged into the wall and compared the consumption of three power supplies at different demands. I chose 1-10W in 1W steps plus some more as output on the USB tester and then checked what the Voltcraft was showing.
Results of a Leicke 75W regular power supply vs. a Ulefone 66W DP adapter (came with the phone) vs a Ugreen 65W GaN charger "up to 95% efficiency".
Up to 10W all of them behave the same way and offer low efficiency. So if you can: attach more than one 12V device to the same power supply to get above 10W total consumption if you want to save energy.
Around 10W the PD power supplies get ahead a bit of the Leicke, which might be caused by the reason the Leicke only has around 85% max efficiency while the others level out at around 87%. At 25W (cost in Europe around 50 Euro/year) we are talking about less than 1W (1 Euro/year cost difference).
I would go down the 12V PD charger route if I have trouble buying regular 12V power supplies or if I just need another one, but exchanging one against another isn't worth the money.
I have another 12V supply (Meanwell) I wasn't able to test because it is running 24/7 (NAS and firewall), but I doubt there will be a big difference. I also had no time yet and need to see if I have enough parts to check what happens if I run a device on 12V and a second one on 5V (Ugreen has 2x USB C and 1x USB A) vs. attaching these devices to separate adapters.
Guess I also will spend some time comparing 5V USB adapters as a part of my equipment, including the switch, runs at 5V.
With such a BIOS, this computer came to me in early January. Here is from the manufacturer's website - FMI01 N5105/N6005解除功耗墙(鸡血全开版BIOS)适用于V3 V4版 2022-08-31更新Which bios name did you find the speed fan control, not seeing it under my cwwk bios but it is a bit of a mine field with it being unlocked. I see the pc health section with the fan speed but no way to adjust fans.
P.S. Oh, I didn’t see that you have a device with 6 ports. First, the conversation was about the cover and fans. Yes, it has already been written here - the manufacturer seems to have abandoned updating the BIOS of models with 6 LAN ports.
Attachments
-
 111.4 KB Views: 106
 -
 88.7 KB Views: 110
 -
 125.5 KB Views: 152
 -
 110.9 KB Views: 159
 -
 90.3 KB Views: 154
Last edited:
Wish it was that simply, pushing it down either side with light or heavy force by hand or flat head showed no hinges or gap or movement, that metal piece was almost welded on only the hammer pushed it down then I wiggled it till it came off.It is a punch-out relief. If you press on it on the opposite sides of the two hinges and press down lightly, you should see that it is only holding on by the two hinge points. Simply bend it back and forth and it will break loose.
BobS
Might be how the newer units are or just the cwwk 6 nic version.
Lucky with that Smart fan bios option! Its all good just ordered a 120mm noctua low noise fan, hopefully don't get any turbulence or nasty electrical noise since my routers only 1 meter from where I use the computer.With such a BIOS, this computer came to me in early January. Here is from the manufacturer's website - FMI01 N5105/N6005解除功耗墙(鸡血全开版BIOS)适用于V3 V4版 2022-08-31更新
P.S. Oh, I didn’t see that you have a device with 6 ports. First, the conversation was about the cover and fans. Yes, it has already been written here - the manufacturer seems to have abandoned updating the BIOS of models with 6 LAN ports.
That is a good set up with the fan on top and bottom, at least peace of mind.
Its just plain odd though they put all that effort of adding a 4 pin header on the mobo, so one can control the power and speed of the fan and forget to add the feature in the bios for one to make use of itSame here, the bios of a N6005 with 6xi226 hasn't got any Smart Fan section. Tried to complain with CWWK, they couldn't give a flyin' f**k.
Bit like making a car and forgetting to add the wheels....
Anyhow a good note for future 6 nic buyers be aware you may not get the smart fan control in bios, I believe you might be able to do some fan control with tweaks, scripts but its apparently not so easy with openwrt at least.
I pulled the trigger on being the Guinea pig for the i3-1215U 6xi226 from CWWK. I ordered it directly from their website Feb 20, and it was delivered to me in Los Angeles today (Mar 3). Total $341.47 USD (bare system), which is a bit cheaper than on aliexpress. I've pulled it out and have a few first impressions to share.
I received the black version (didn't specify in the order), and it looks and feels quite nice. It came in a nicer box than I expected, and included the manuals (in Chinese), power supply, SATA cables, screws, and a screwdriver (???). It also came with a fan pre-installed, even though I didn't order that. It did not come with an M.2 adapter to install a second M.2 2280 drive as shown in some of the aliexpress listings.
Looking at the installation, I can't see any gap between the CPU and the copper pad. I can make out the "X" of the heat spreader. I don't have any extra thermal paste lying around, so I'm not planning on taking off the motherboard to see the heat spreader.
It first booted into a UEFI interactive shell. On the third boot I finally got the BIOS settings. Poking around I did not see an obvious way to set up serial port redirect, though there is a serial port header on the board. I'm not going to poke around with this since this forum alerted me to the cheap USB HDMI capture devices, which work better than a null modem for using the console.
I've installed Ubuntu to test it out, as that's what I'll be running on it when I put it in "production". I was unable to get 22.04 installed due to multiple errors, which looks resolvable, so I'll post here when I get that sorted out. For now I've got 22.10, which installed and runs fine.
With the stock BIOS settings and Ubuntu install, it uses 15W (measured from the wall), and sits at 40°. After going back into the BIOS and enabling C-states, and disabling SATA and HD Audio (guessing those last two didn't do much), it dropped to 13W, 36°. This is with one ethernet cable, HDMI, and keyboard plugged in.
Running a stress test, I could only get it to 28W, 50°. Turns out PL1 and PL2 were set to 15W & 35W, ~20 secs apart. I couldn't find a setting for this in the bios, but found a shell script that will change it in Linux. Next I'm going to play around with this a bit to see how far I can push it, and see how it does with the fan removed as well.
I'll follow up here with anything else interesting I find. Let me know if there's something you want me to look at while I'm testing it out.
Think I did try disabling HD audio/sata and yeah no real difference on my power wall meter, there are some other bios tweeks if you are looking to try and get the wattage down posted here. I got the similar cwwk box but N5105 x6 nic and my unit looks same apart from mobo, same included mini fan also. Just sata cable and back plate were thrown in after a request on cwwk chat.I pulled the trigger on being the Guinea pig for the i3-1215U 6xi226 from CWWK. I ordered it directly from their website Feb 20, and it was delivered to me in Los Angeles today (Mar 3). Total $341.47 USD (bare system), which is a bit cheaper than on aliexpress. I've pulled it out and have a few first impressions to share.
I received the black version (didn't specify in the order), and it looks and feels quite nice. It came in a nicer box than I expected, and included the manuals (in Chinese), power supply, SATA cables, screws, and a screwdriver (???). It also came with a fan pre-installed, even though I didn't order that. It did not come with an M.2 adapter to install a second M.2 2280 drive as shown in some of the aliexpress listings.
Looking at the installation, I can't see any gap between the CPU and the copper pad. I can make out the "X" of the heat spreader. I don't have any extra thermal paste lying around, so I'm not planning on taking off the motherboard to see the heat spreader.
It first booted into a UEFI interactive shell. On the third boot I finally got the BIOS settings. Poking around I did not see an obvious way to set up serial port redirect, though there is a serial port header on the board. I'm not going to poke around with this since this forum alerted me to the cheap USB HDMI capture devices, which work better than a null modem for using the console.
I've installed Ubuntu to test it out, as that's what I'll be running on it when I put it in "production". I was unable to get 22.04 installed due to multiple errors, which looks resolvable, so I'll post here when I get that sorted out. For now I've got 22.10, which installed and runs fine.
With the stock BIOS settings and Ubuntu install, it uses 15W (measured from the wall), and sits at 40°. After going back into the BIOS and enabling C-states, and disabling SATA and HD Audio (guessing those last two didn't do much), it dropped to 13W, 36°. This is with one ethernet cable, HDMI, and keyboard plugged in.
Running a stress test, I could only get it to 28W, 50°. Turns out PL1 and PL2 were set to 15W & 35W, ~20 secs apart. I couldn't find a setting for this in the bios, but found a shell script that will change it in Linux. Next I'm going to play around with this a bit to see how far I can push it, and see how it does with the fan removed as well.
I'll follow up here with anything else interesting I find. Let me know if there's something you want me to look at while I'm testing it out.
View attachment 27574View attachment 27569View attachment 27573View attachment 27568View attachment 27571View attachment 27567View attachment 27572View attachment 27570
Still 13watt is impressive considering the much more powerful intel cpu you have, can I ask what type of wattage do you roughly get if you run a web browser with several or more tabs/pages and an YT 4K video full screen?
My next job is to ditch my bulky 60-80watt desktop pc with something much more energy better, something like this might be the ticket.
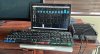
Could you explain how you would use this instead of a serial port?USB HDMI capture devices
I'll show you. That USB device basically turns my laptop into a monitor for the server. Use it and an HDMI cable to plug into the computer, open VLC, and start viewing the capture device. That's the display. I have to use a separate keyboard to type into the server.Could you explain how you would use this instead of a serial port?
For me, this is about as good as my alternative of setting up a serial console with a null modem cable. My use case is the small number of times the system doesn't boot properly, and I need console access to debug it. Previously, that required lugging a monitor to my server room (a/k/a bedroom closet). The parts for a serial connection (usb serial, null modem cable, serial port for server) would be more expensive than the USB HDMI device. Then when I need a local console, it's almost always due to a BIOS problem, so I need to be sure I can get in to the settings, and the devices in my price range can "forget" the settings for a serial port console and require HDMI anyway.
Attachments
-
 271.7 KB Views: 133