They don't.Not sure if the drives remain powered if the rear switch is on, but the system is off. Something for me to go check on my lab box, I guess.
Riverbed CX-770 $30BO
- Thread starter hmartin
- Start date
Notice: Page may contain affiliate links for which we may earn a small commission through services like Amazon Affiliates or Skimlinks.
So I'm intrigued. a little late to the party but intrigued nonetheless. The question I'd ask myself is how would I want to mount it as the rackmount kit seems inefficient. The dimensions on the CX-770 seemed vaguely familiar in proportion too.
yep...

Riverbed RMK-016. talk about over-engineering. Zones has "call for availability" $~458.00USD - I'm sure this is a unicorn part but maybe worth setting up a search on the bay for this. Given the width, height and weight, a 1u no lip cantilever shelf (or two b2b) might work just fine to mount a pair in 1u.
posting mostly for S&G since this hasn't appeared in the thread yet.
yep...
Riverbed RMK-016. talk about over-engineering. Zones has "call for availability" $~458.00USD - I'm sure this is a unicorn part but maybe worth setting up a search on the bay for this. Given the width, height and weight, a 1u no lip cantilever shelf (or two b2b) might work just fine to mount a pair in 1u.
posting mostly for S&G since this hasn't appeared in the thread yet.

I ended up swapping the fans out on my second box for these Evercool EC4020SH12BP fans, which are so far a nice balance between the noisy stock fans and quiet-but-weak Noctua fans.
I added 16GB RAM and two 100GB Intel S3700 SSDs to mine. I installed Proxmox by attaching a GPU with a riser cable, and have set up a pfSense VM as my primary router. The two i210 interfaces are passed through to the VM directly and connected to my primary and backup internet connections, and the other 4 ports are attached to an Open vSwitch bridge—which the VM is also connected to. So far, speeds are great—basically line speed, about 920Mbps up and down. Really happy with this little box so far. Kinda wish I bought more than two. I'll be running a few more core service/bootstrapping VMs on this machine; most of my VMs will continue to live on my beefier VM host.
I added 16GB RAM and two 100GB Intel S3700 SSDs to mine. I installed Proxmox by attaching a GPU with a riser cable, and have set up a pfSense VM as my primary router. The two i210 interfaces are passed through to the VM directly and connected to my primary and backup internet connections, and the other 4 ports are attached to an Open vSwitch bridge—which the VM is also connected to. So far, speeds are great—basically line speed, about 920Mbps up and down. Really happy with this little box so far. Kinda wish I bought more than two. I'll be running a few more core service/bootstrapping VMs on this machine; most of my VMs will continue to live on my beefier VM host.
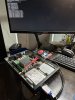
Sounds like a nice build. Are you still using the original case, and how did you mount the GPU?attaching a GPU with a riser cable
Ah, this was only temporary. Doesn't appear that Proxmox can easily install over a serial console alone, so I went this route rather than deal with installing on another machine and swapping the disk over. Now that it's installed, I'm back to using the serial console alone, since—absent decent IPMI—that's easier for me to deal with than a keyboard and monitor would be.Sounds like a nice build. Are you still using the original case, and how did you mount the GPU?
Attachments
-
 495.4 KB Views: 108
Thanks for the background.this was only temporary.
I am trying to find a way to get an SFP+ card mounted inside the existing case, or a different case.
Regarding Proxmox install without a video card...
You can do it if you have a hypervisor that allows USB drives to connect to VMs. The basic concept is to install Proxmox as a VM using a USB attached SATA drive, then modifying Proxmox to use a serial port for console going forward. You can do the same with a PC and a SATA drive, just skip the VM bits, install, and edit Proxmox files to use the serial port.
My chicken scratch notes (obviously I am not a tech doc writer for a living LOL)...
VMware Fusion (should work just fine with VMware Workstation too)
-Make a new VM using Proxmox ISO
-UEFI, Debian 10x 64bit,
Adjust VM Settings and Resources:
-Network Adapter -> Bridged Networking
-Enable all CPU advanced functions
-Hard Disk -> Advanced options -> Remove Disk
-Power On to Firmware
-VMware Menu: USB & Bluetooth -> Connect USB drive
-VM Firmware Menu -> Reset the system
-Should boot from the ISO, install Proxmox as normal, and reboot
——————————————————————————
mkdir /etc/init
vi /etc/init/ttyS0.conf
# ttyS0 - getty
#
# This service maintains a getty on ttyS0 from the point the system is
# started until it is shut down again.
start on stopped rc RUNLEVEL=[12345]
stop on runlevel [!12345]
respawn
exec /sbin/getty -L 115200 ttyS0 vt102
——————————————————————————
/etc/default/grub
GRUB_DEFAULT=0
GRUB_TIMEOUT=5
GRUB_DISTRIBUTOR="Proxmox Virtual Environment"
GRUB_CMDLINE_LINUX_DEFAULT="quiet console=tty0 console=ttyS0,115200"
GRUB_CMDLINE_LINUX=""
# Disable os-prober, it might add menu entries for each guest
GRUB_DISABLE_OS_PROBER=true
# Uncomment to enable BadRAM filtering, modify to suit your needs
# This works with Linux (no patch required) and with any kernel that obtains
# the memory map information from GRUB (GNU Mach, kernel of FreeBSD ...)
#GRUB_BADRAM="0x01234567,0xfefefefe,0x89abcdef,0xefefefef"
# Uncomment to disable graphical terminal (grub-pc only)
GRUB_TERMINAL=console
——————————————————————————
update-grub
——————————————————————————
Move SATA drive to the CX-570/770 box and it should boot, and display console via the serial port.
Last edited:
Not sure why I didn't think of this before. I reversed the fans and it's so much better with the air duct guide.Alright, instead of adding another fan, I decided to model and 3d print an air duct. Here's the file should anyone want to try. The attached model is a revision of the one in the photos. This takes the shunt resistor (I think) into account and additional vent holes for better airflow. Print using a 0.4mm nozzle at 0.2mm layer height. I recommend PETG since that heatsink will get hot enough to melt PLA.
It's currently idling at 43c (old version) 36c - 39c (new version) in an office that's at 26.7c (80F) ambient temperature. The fan is a little quieter now as well.
Realistically, after 8 hours of idling, it's around 44c. Earlier numbers were too optimistic. Still not bad but not WOW as I was hoping for.
View attachment 23805
View attachment 23800
View attachment 23793
View attachment 23795
View attachment 23804
Bash:
foureight84@riverbed-cx-770:~$ sensors
coretemp-isa-0000
Adapter: ISA adapter
Package id 0:  +29.0°C  (high = +86.0°C, crit = +100.0°C)
Core 0:        +27.0°C  (high = +86.0°C, crit = +100.0°C)
Core 1:        +22.0°C  (high = +86.0°C, crit = +100.0°C)
Core 2:        +29.0°C  (high = +86.0°C, crit = +100.0°C)
Core 3: +25.0°C (high = +86.0°C, crit = +100.0°C)You could also install it over Debian as well Install Proxmox VE on Debian 11 Bullseye - Proxmox VERegarding Proxmox install without a video card...
You can do it if you have a hypervisor that allows USB drives to connect to VMs. The basic concept is to install Proxmox as a VM using a USB attached SATA drive, then modifying Proxmox to use a serial port for console going forward. You can do the same with a PC and a SATA drive, just skip the VM bits, install, and edit Proxmox files to use the serial port.
My chicken scratch notes (obviously I am not a tech doc writer for a living LOL)...
VMware Fusion (should work just fine with VMware Workstation too)
-Make a new VM using Proxmox ISO
-UEFI, Debian 10x 64bit,
Adjust VM Settings and Resources:
-Network Adapter -> Bridged Networking
-Enable all CPU advanced functions
-Hard Disk -> Advanced options -> Remove Disk
-Power On to Firmware
-VMware Menu: USB & Bluetooth -> Connect USB drive
-VM Firmware Menu -> Reset the system
-Should boot from the ISO, install Proxmox as normal, and reboot
——————————————————————————
mkdir /etc/init
vi /etc/init/ttyS0.conf
# ttyS0 - getty
#
# This service maintains a getty on ttyS0 from the point the system is
# started until it is shut down again.
start on stopped rc RUNLEVEL=[12345]
stop on runlevel [!12345]
respawn
exec /sbin/getty -L 115200 ttyS0 vt102
——————————————————————————
/etc/default/grub
GRUB_DEFAULT=0
GRUB_TIMEOUT=5
GRUB_DISTRIBUTOR="Proxmox Virtual Environment"
GRUB_CMDLINE_LINUX_DEFAULT="quiet console=tty0 console=ttyS0,115200"
GRUB_CMDLINE_LINUX=""
# Disable os-prober, it might add menu entries for each guest
GRUB_DISABLE_OS_PROBER=true
# Uncomment to enable BadRAM filtering, modify to suit your needs
# This works with Linux (no patch required) and with any kernel that obtains
# the memory map information from GRUB (GNU Mach, kernel of FreeBSD ...)
#GRUB_BADRAM="0x01234567,0xfefefefe,0x89abcdef,0xefefefef"
# Uncomment to disable graphical terminal (grub-pc only)
GRUB_TERMINAL=console
——————————————————————————
update-grub
——————————————————————————
Move SATA drive to the CX-570/770 box and it should boot, and display console via the serial port.
Debian can be installed over serial at the Grub boot by pressing 'e' at the install option. I recommend selecting the expert install option under advanced. Then in the edit screen, look for the line that has 'vga=788 ---' (should be the middle line). You'll want to edit it to say 'vga=off --- console=ttyS0,115200n8' and then press ctrl+x to boot with those parameters. Then quickly reconnect with Putty with the 115200 baud rate. In older versions of Debian, you would have to edit the grub config to default to console but this seems to be correctly set after installation on Debian 11. Once that's done you can follow the guide above to install proxmox.
I don't know if this is a bug or it's actually correct but if you enable ACPI AUTO CONF in bios then checking powertop shows that the CPU can enter into C7 state. Although I would not recommend running `powertop --calibrate` or `powertop --auto-tune`. It seems that either of those commands will disconnect the SATA controller and crashes the system. I'm currently running Debian 11.

True and it usually works fine. But over the years I have seen less-than-enthusiastic support for such installs in the Proxmox forums, so I tend to prefer native installs. YMMV of course.You could also install it over Debian as well Install Proxmox VE on Debian 11 Bullseye - Proxmox VE
Debian can be installed over serial at the Grub boot by pressing 'e' at the install option. I recommend selecting the expert install option under advanced. Then in the edit screen, look for the line that has 'vga=788 ---' (should be the middle line). You'll want to edit it to say 'vga=off --- console=ttyS0,115200n8' and then press ctrl+x to boot with those parameters. Then quickly reconnect with Putty with the 115200 baud rate. In older versions of Debian, you would have to edit the grub config to default to console but this seems to be correctly set after installation on Debian 11. Once that's done you can follow the guide above to install proxmox.
I also should have mentioned my notes for headless install was for 6.x Proxmox, not sure if they are accurate for 7.x.
Gotcha! It has been a while since I've installed proxmox. I didn't realize they don't provide much support for that method.True and it usually works fine. But over the years I have seen less-than-enthusiastic support for such installs in the Proxmox forums, so I tend to prefer native installs. YMMV of course.
I also should have mentioned my notes for headless install was for 6.x Proxmox, not sure if they are accurate for 7.x.
ECC and non-ECC unbuffered (udimm) DDR3/DDR3L 1066/1333/1600Hey anyone know what kind of memory these take ?
would you be able to share the extender cable you used for the video card? i'd like to source one from ebay or amazon.Ah, this was only temporary. Doesn't appear that Proxmox can easily install over a serial console alone, so I went this route rather than deal with installing on another machine and swapping the disk over. Now that it's installed, I'm back to using the serial console alone, since—absent decent IPMI—that's easier for me to deal with than a keyboard and monitor would be.
This was mentioned previously in the thread, but only E5/E7-series Xeons accept Reg DIMMs. Celeron/Pentium/E3-Xeons will only accept unbuffered DIMMs.i wasn't able to get registered ECC memory working in my CX770, only udimms